Monday, October 30, 2017

Plum Purdy Halloween

Well, hello again!  I made a Halloween card over the weekend.  It will be my one and only, seeing as how I just this year sent out the Halloween cards I made last year.  I know!  I'm usually so good about mailing my cards, but I got confused last year.  Who gets a birthday card?  Who gets a Halloween card?  Maybe I'll make just a couple more... and the next thing I knew it was too late to send them.


I can't help myself, I do think they're some of the most fun cards to make.  I'm thinking I must buy some new Halloween stamps, but perhaps I haven't seen anything that compels me.  However, this too cute cat was stamped out and sent to me by my bloggy friend, Sherri.  She sent me several Plum Purdy images, saying they were so cute I'd have to start coloring immediately.  And she was right!


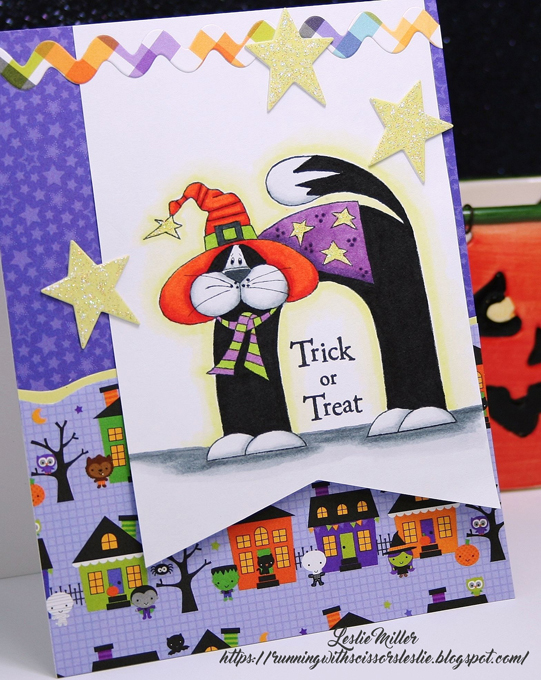
Plum Purdy stamps are no longer in production, tsk tsk.  I don't even know the name of this one.  I colored with Copics and used Doodlebug papers and a Hero Arts sentiment.  The dies are not Halloween, but they work -- Sizzix Primitive Stars and Taylored Expressions Ric Rac Borders.  All the stars are slathered up with Stickles Stardust glitter.

It's time for me to get intense with the Christmas cards, but I'll have a few non-Christmas cards to share along the way, too.  Happy Halloween (tomorrow)!


Friday, October 27, 2017

Friday Funny with Yet More Coffee

Hi there!  We just got back from a three day get away in our comfy little travel trailer and it felt like pure heaven to me.  Gosh, I needed that.  I was completely disconnected while we were gone, so I've got a little catching up to do with my blog visiting, but I'll get there.

Since I sat down here to do a quick email I thought I might as well share another coffee card while I was at it.  I don't know what got into me with the coffee cards.  Stella was colored up for a friend's birthday.  Totally not birthday-related, but my friend's a coffee drinker and she enjoyed the humor.


Stella is a Bugaboo digital stamp called "Frame It - Stella - Drink Coffee".  She's colored with Copics and has quite a bit of glitter added, along with some white gel pen dots which you can barely see in the photo.  Using more of this old Stampin' Up paper while I had it out, too.

Now that we're back I've got a lot of laundry to catch up on, so I'd better hop to it and then I've got a date with the couch.  I'll see you again soon.  Enjoy your weekend!


Wednesday, October 25, 2017

Quickie Snowflake Christmas Cards with Ribbon

Hello!  I hope you won't be blinded by all the white in these photos today.  I've made three quickie Christmas cards, just trying to gain some ground before I get back to coloring.  Also... now don't be shocked... I bought seven rolls of Christmas ribbon at JoAnn's the other day.  I know!  I seldom use ribbon these days and I bought seven new rolls!  Am I nuts?  But it was almost my birthday and it was 40% off...    So I set out to use some of it, starting with a pretty satin snowflake ribbon which just happens to match Stampin' Up's Soft Sky.

All the snowflakes were thoroughly smooshed with Versamark ink and embossed with Iridescent Peacock embossing powder.  It gives a delicate shimmery sparkle, but no color other than an iridescent quality.

On the first card I embossed a Cuttlebug Candy Cane Stripe border.  Hard to see in the photo.  Each snowflake is backed by a 1/2" punched circle, which is only there to give more glue surface for adhering to the ribbon.  Only one snowflake is glued directly onto the ribbon, but I thought they should all match.  The "Noel" is SU's Wonderful Wreaths Framelits die.  The snowflakes are Simon Says Stamp Melody Snowflake.


Card #2:  Larger snowflake is Simon Says Stamp Eliza Snowflake.  Smaller snowflake is Simon Says Stamp Melody Snowflake.


Card #3:  Wild Rose Studio Lacy Snowflake and Impression Obsession Holiday Bottom Word Edgers


Quick and snowy!  Are you making progress on your Christmas cards?  I'm almost halfway there, but time is running out.  Now, don't stress...  this is one of those small things we can say "yes" or "no" to, right?  Keep it fun!

Have a beautiful day, and I'll see you again soon!


Monday, October 23, 2017

Coffee Please

Hi there!  I didn't think I'd have any new fall stamp sets, but then Verve came up with their very first digital set and I just had to give it a try seeing as how I think it's so darn cute.  Didn't hurt that it's a whole stamp set for only $4.  Oops, is my cheap side showing?  Well, who doesn't love a bargain?  The set is called Coffee Please.

I know digis aren't for everyone and, true, when I have a little time to stamp it doesn't involve going to the computer first.  I like to go into my room and simply start creating.  However, when I think ahead it's fun to put some images together for coloring later.  So that's what I did here.  I goofed around in Photoshop Elements, moving and turning and resizing several images from the set.  Photoshop's magic eraser made it easy to remove white space from the individual images so I could layer them.


I colored with Copics on Neenah Classic Crest Solar White and added just a little tab of burlap ribbon and a leafy swoosh for accent.  The image panel is popped up.  Simple and easy to mail.

Inside I used another of the four sentiments that come with the set.  I think this one works perfectly well for a fall birthday.


Fall is a funny season.  We've had some beautiful days and some rainy, blustery days.  Every time I turn on the news I see another weather catastrophe or man made tragedy and my heart hurts for all those affected.  Again, I count my blessings and try to keep all my little problems in perspective.

I'll be back to visit again this week.  'Tis the season for making lots of cards! 


Stamps:  Verve "Coffee Please" digital set  Paper:  Neenah Classic Crest,  SU Glorious Green, kraft card base, Graphic 45 Raining Cats and Dogs designer paper  Ink:  Printer, Copics for coloring  Accessories:  Burlap ribbon, Memory Box Cross Stitched Frame Borders, Spellbinders Floral Flourishes, Scotch brand foam mounting tape

Friday, October 20, 2017

Enjoy Life and Coffee

Okay, here's one last card for the week and it's an easy one.  It's not "clean and simple", but it was simple to make -- just layered die cuts, a stamped sentiment, designer paper, and a bit of ribbon.  It's another card to include in the batch for my friend.  I do think it would be cute with a Starbucks gift card enclosed.


I'm pretty excited that I used ribbon again.  I'm like the little bird pecking away at the mountain.

The CUTplorations Coffee Cup Silhouette die is on loan from my friend, Nancy.  Thanks, Nancy!  I was only going to cut a couple to have on hand before she came back to reclaim the die, but the card just sort of made itself once the die was cut.  The designer paper is old, old, old from Stampin' Up!, and the sentiment is from Power Poppy's "Short Stacks" set.  I'll sum it all up in the recipe below.

Take care of yourself, stay well, and have a happy day!


Stamps:  Power Poppy "Short Stacks" sentiment  Paper:  Shimmery Ivory, Ruby Red, retired Stampin' Up! designer paper  Ink:  Ruby Red  Accessories:  Ribbon, CUTplorations Coffee Cup Silhouette, Taylored Expressions Stitched Rectangle Stacklets, Paper Smooches Hearts, Scotch brand foam mounting tape

Wednesday, October 18, 2017

LEAVE it to Me Double D Challenge

Presenting a new Double D Challenge today:  LEAVE it to Me!  You guessed it... anything with leaves.

My card today is made entirely from die cuts and one little ol' stamped sentiment.  I really wanted to color something, but I also wanted to stay at least somewhat true to the inspiration board and coloring just didn't work out.  So... here's my card:


And here's our inspiration board:


I love the gold leaves against the blue, and the frosty white against the blue, and those patterned leaves...  The pie looks absolutely delicious, too, but I'm guessing it hasn't been baked yet.  So beautiful, though.

The team votes on favorites (always the most difficult part of the challenge), but there's also a prize for a random winner:


Well... my card doesn't look a whole lot like anything in the inspiration board, but I did use patterned paper for the leaves.  And blue, but not the same shade of blue.  Hey, the idea is to be inspired.


A year or more ago I decided I needed to add a basket die to my collection so I got this one by Impression Obsession.  This is the first time I've used it, which just goes to show how badly I needed it, but you never know.  All the other dies on this card are oft-used favorites.  I'll list all dies here:


  • Impression Obsession Basket
  • Taylored Expressions Mega Leaves
  • Impression Obsession Grass
  • Memory Box Stitched Circle Layers
  • PoppyStamps Main Street Stitched Tags
  • Spellbinders Grand Scalloped Squares


Hop over to the Double D blog to see more samples and leave some love.  I hope you can play along.  Take care!


Stamps:  Very old Firecracker sentiment  Paper:  Neenah 110 lb white, Core'dinations 65 lb white and pre-cut white card base, SU Chocolate Chip, Old Olive, and Certainly Celery, retired SU designer paper  Ink:  SU Chocolate Chip and Creamy Caramel  Accessories:  Polytwill ribbon, corner rounder punch, dies as listed above

Monday, October 16, 2017

Bright and Fun for a Birthday Boy

Hi there!  I'd like to start off by saying that yesterday was my birthday and my family and friends, local and afar, made it a very special week for me.  Your birthday is the one day that, in your life, belongs to you, alone, and when it's recognized and celebrated it makes you feel extra good.  One local friend even helped Wally and LuLu send a birthday card to me.  So... thank you everyone!!

Now, for today's card... I've had the parts cut and the image stamped and everything ready to color and put together ever since I used the Sparkle N Sprinkle Cars set for the first time last month.  Same designer paper, but different theme and accents.  I get such a kick out of making kids' cards -- so bright and fun -- but I really don't have much chance to use them.  However, this one is going with a batch I'm giving to a friend.


That's two cards done for her and many, many to go.  When I told my husband I needed lots of cards and only had two done he said "Only two?  What do you do in there?"  Sheesh.  These cards don't make themselves you know!  Never mind that I'm probably the world's slowest stamper.  I spend too much time thinking and visualizing and pushing parts around before anything is glued down.  I've never wanted to hurry the process, but sometimes I wish... sigh...

The ingredients listed below my signature will pretty much explain the card so I'll just mention a couple of things.  Coloring was done with Copics, including the balloon.  I used Stampin' Up! markers to color each letter of the sentiment.  Inside looks like this:


I'm not sure how apparent it is in the photo, but the red border is a frame.

And that's that!  Lots of fun.  Onto more grown up stuff the rest of the week but, really, it's all just grown up play, isn't it?  Have a great day!


Stamps:  Sparkle N Sprinkle "Cars"  Paper:  X-Press It Blending Card, red and blue card stock, old BasicGrey (?) designer paper  Ink:  Memento Tuxedo Black, Stampin' Up! markers for sentiment, Copics for coloring  Accessories:  MFT Die-namics Wonky Stitched Squares, Spellbinders Grand Squares (to make red frames), Impression Obsession Balloons, Memory Box Banner Parade (includes stars on card front), MFT Die-namics Star Stax (stars inside card), Scotch brand foam mounting tape

Friday, October 13, 2017

Flowers on Yellow and White

Hello and happy Friday!  Today is the first of many cards I'm making for a friend.  She says she needs a variety, so I started with one of the happiest cards to make -- birthday.  Yellow and white is, for me, one of the happiest color combos, too, so, you see, there's happy all over this card!


I used Power Poppy's So Grateful clear stamp set for the flowers and Dahlia XL for the sentiment.  Coloring was done with Copic markers.

My friend loves a dressed up card so I pulled out all the stops with pretty die cuts, an embossed background, a little bit of designer paper, and I even added a bow.  As a final step I put Nuvo drops in the corners of the yellow die cut, which is always a little scary as I'm never sure if they're going to turn out okay.  I will say for certain that the glossy drops are the easiest to apply.  I don't know why.


I'll wrap up all this sunshiny cheerfulness for now and list all the ingredients in the recipe below my signature.  Wishing you a beautiful fall day!


Stamps:  Power Poppy "So Grateful" and "Dahlia XL" clear stamp sets  Paper:  Neenah 110 lb white, other white, yellow card stock, scrap BasicGrey June Bug designer paper  Ink:  Memento Tuxedo Black, Copics for coloring  Accessories:  Organdy ribbon, Nuvo Gloss Crystal Drops - Simply White, Cuttlebug Wicker Weave embossing folder, Marianne Designs Anja's Oval die, Memory Box Oval Master Frame (just used the oval that popped out when cut), Scotch brand foam mounting tape

Monday, October 9, 2017

Dazzling Dahlia

Hello there!  Did you remember Saturday was World Card Making Day?  Somehow I failed to realize that until the day was upon me and I had other plans.  I did mail two birthday cards on Saturday, though.  Does that count?

The card I'm sharing today is Power Poppy's Dahlia XL, watercolored with my Spectrum Sparkle brush pens, plus one color of Twinkling H2Os.  I was thinking fall with russet tones and this is how it turned out.


Bright, isn't it?  Yikes!  Maybe I should call this "Dahlia on Fire".  You can't even see the sparkle in the first photo.  It shows up a little more here:


And here:


Love those sparkle pens!

I started out with Macaroon and Biscuit sparkle pens (pink and yellow), and left some of that showing for highlights as I added Hearthside sparkle pen (red) and Ginger Peach Twinkling H2O (russet).  The background is shaded with Ocean Wave and Sage sparkle pens.  The gold splats are Ginger Peach Twinks.

I tried to echo all the colors of the dahlia in the designer paper card base, the light gold shimmery mat, and the copper cord.

I'm going to play along in The Flower Challenge's 1st birthday celebration -- "Use Your Favorite Flower".


I think my favorite flower is just about anything Marcella draws, but dahlias do fascinate me because of the incredible variety and some of those huge "dinner plate" blooms.  There are prizes for this birthday celebration and we're supposed to name our choice just in case we win.  Well, gee, there are still a few Power Poppy digis I don't have yet...

That's it for today!  I hope to see you again soon.  Till then...


Stamps:  Power Poppy Dahlia XL  Paper:  Arches 140 lb hot pressed watercolor, light gold satin metallic, white card base, BasicGrey June Bug designer paper  Ink:  Palette Noir  Coloring:  Spectrum Sparkle watercolor bush pens and Twinkling H2Os as listed above  Accessories:  Copper cord, Taylored Expressions Stitched Rectangle Stacklets

Monday, October 2, 2017

Just for Fun Critter Friends

Hi!  October 1st?  Holy cow!  I'd better get with the season!  I don't have any new fall stamps yet this year, but I was pretty sure I could make a fall-ish scene with some not yet used dies.  It's pretty simplistic, but I thought I'd stop while I was ahead.

This reminds me so much of LuLu and her squirrel friend, the way they stand nose to nose at the tree.


I rubbed a little ink into the background and colored the dies with Copic markers.  Used a white gel pen to add spots and a white tail tip to the dog.  The image panel has a red layer under it, but I didn't want to add an additional border.  It's just there to make the sentiment show up better.

Dies:  Memory Box Tree of Wonder, Amy Designs Cats and Dogs, Impression Obsession Squirrel Set, Paper Smooches Hello Words

I'm including this in Darnell's 10 day NBUS challenge.  The tree, squirrel, and dog are all NBUS, and I've had them quite a while, tsk tsk.


Speaking of LuLu, while I was sick she had to take herself for a walk:


Just kidding, but isn't she cute?  Rich walked the dogs all on his lonesome while I was sick, but I'm back to going with them again.  Whenever we reach the halfway mark LuLu wants to carry her leash.  I hang onto part of it until we get to our own street, and if there are no cars coming I'll let her take herself home.

Have a happy day, week, month, season, year, and I'll see you again soon!