Wednesday, December 28, 2022

Watercolor on Black

Hello friends!  I hope this finds you all happy and relaxed after Christmas.  I'm basking in the peace and calm that comes this last week of the year.  We had a minor wind storm that left the yard a mess of debris but this can be dealt with in due time.  We didn't even lose power.  As we watch the weather catastrophes on the news we're feeling very fortunate indeed.

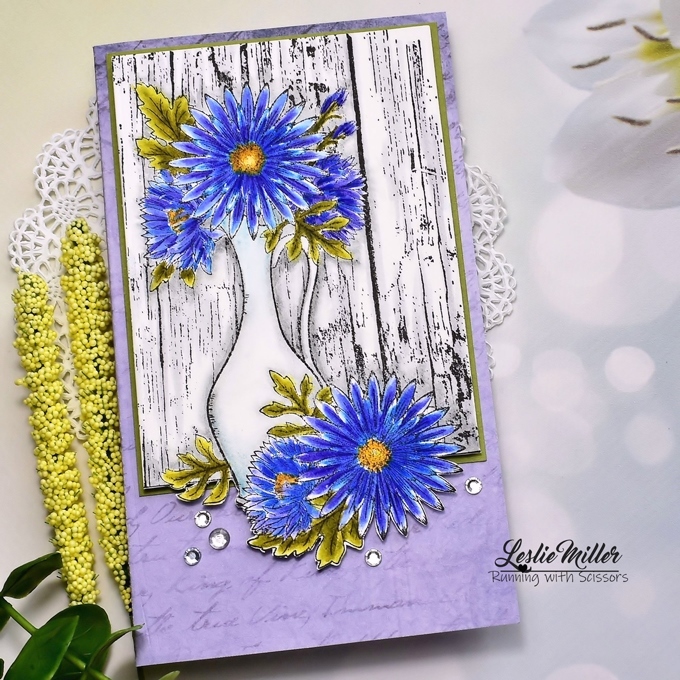
I've been enjoying some time in my stamp room and am thinking I'd better get a card posted while I have a chance.  Today you can see I've been at my black watercolor paper again.  My new flower stamp from Woodware is called Floral Wonder, and it is wonder-full with all that open space in the flowers and leaves which make it so nice for watercoloring.  There are limits to what you can do with the blending of metallic inks, but I'm trying out some possibilities.


Working with metallics on black is an interesting experience.  I've used a higher concentration of paint for good coverage, and in this case I started at the petal and leaf tips and brushed inward, leaving black showing at the base.  At the tips of the petals I added a hint of darker purple, the effect of which is much more apparent as you move the card in your hand.  Just learning and playing.  My paints are the old-timey Twinkling H2O's.  There are some very pretty and fine quality pearlescent paints on the market which I may try someday.

The gold embossing is my usual Ranger Princess Gold, but even that looks different on the black watercolor paper.  Is it just me?  When heat set it does not raise up all smooth and sleek as you would expect.  Rather, it lays more flush with a grainy texture.  It's not a bad thing.  Just a whole other look.  Note that I'm using black watercolor 140 lb cold press as opposed to mixed media cardstock.  I'm sure each paper enables a different result.


I added gold splatters and didn't even make much of a mess this time.  I've made a note to self to leave the fan brush alone when it comes to splatters. 🙄

So there you have it, my second experiment with metallic watercolors on black.  It intrigues me and I will try again.  Have a fantastic day!


Stamps:  Woodware Floral Wonder  Paper:  Stonehenge 140 lb cold press black watercolor, gold satin metallic, pink glitter cardstock  Ink:  Versamark  Coloring:  Watercolor with Twinkling H2O's  Other:  Ranger Princess Gold embossing powder, Cottage Cutz Hello Phrase

Friday, December 23, 2022

The Night Before Cluckmas

Hello, friends!  Are you super busy or are you finally at the point where you can relax for a bit?  I'm going to keep this quick because I'm thinking none of us have a lot of spare time right now.

After I finished and mailed the last of this year's Christmas cards I felt like celebrating, so I did that in the form of making a card that's all fun and lots of play.  I couldn't help myself.


When I was shopping for something else altogether I came upon an Impression Obsession set called Chicken Christmas Sentiments.  It made me laugh and I thought that was a good thing.  So I set off on a mission to find an Impression Obsession stamp set or die to go with it, and this mother hen is what I came up with.  She is simply called Chicken and she comes with the little chick.

The babies are nestled all snug in their bed and Mom is telling them the classic Christmas bedtime story.  Mom and two of the chicks are wearing glittery antlers just for fun.  I drew and hand cut the speech bubble.


A whole host of dies and papers, mostly retired, went into this card.  Your eyes would glaze over reading all of it so I'll not write it all down.  I just wanted to share some fun and wish you a happy Cluckmas... er... Christmas.

I'm going to give myself a whole week with as little housework as possible and maybe have some time to play in my room after Christmas.  Ho ho ho!  Take care and enjoy yourselves!


Tuesday, December 20, 2022

Double D Challenge: Candy Cane


A big holiday hello to all my friends!  Are you ready for another Double D challenge?  I know it's busy times and crafting might not be on the agenda, but this challenge will run into the early days of the new year.  The quiet week after Christmas is one of my favorite times for crafting!

Our challenge is all about the candy cane colors of red and white.  I'm pretty sure you can do something with this even if it's not a Christmas card.  I just love the cocoa pot and the striped cookie jar in the inspiration board:


I just happened to have a candy cane stamp that I love and have used many times.  My clear set is sold out and probably retired from Power Poppy, but it's available as a digi stamp here.  I colored with Tombow markers and blender, then dressed up the card with designer paper cut to look like peppermint sticks.  Fun!


You know how it goes:  The team votes on creative winners, plus there's a cool prize that goes to a random winner.  This time it's a cute candy cane stencil:


The team has some fun and festive cards to share on the Double D blog.  Check them out and say "hello"!  Happy candy cane holidays!


Stamps:  Power Poppy Berry Sweet Holiday (retired)  Paper:  Fabriano Artistico Extra White 140 lb watercolor, Neenah 110 lb white, scraps designer paper  Ink:  Palette Noir  Other:  Memory Box Stitched Layered Circles, Sakura Gelly Roll clear sparkle pen

Monday, December 12, 2022

Snowy Scene

Hi there!  Busy times as we wind up toward Christmas, right?  I enjoy all the activities in the winding up period, but I love the winding down after just as much.  We'll get there soon enough.

Between now and Christmas I will have another card or two.  This one was made and mailed a week ago.  It's more than I would ordinarily do on a Christmas card, but it was the last one to go in the mail and it was local.  Yay!

I'm happy the sun was shining as it cast a lot of shadow on the card which really shows the dimension and texture.  I layered some Memory Box dies with an older Poppystamps Boddington Cottage.  The top layer was backed with just a peek of black and popped up on foam tape.  The middle layer has some blue ink shading.


I splattered everything with white acrylic paint for snow.  Even though I used a splatter shield, the paint went all over everything in a large area of my stamp room -- floor, walls, everything on my table, my glasses, face, clothes... you get the picture.  I must be a very vigorous splatterer!


I hope it arrived okay.  I put a little padding in the center and gave it extra postage.  It was a pretty tight fit in the envelope.

I'm going to share today at the Four Seasons Challenge -- Anything Goes Winter.  Their inspiration board is so beautiful!


The Memory Box dies are Evergreen Sky Collage and Tall Fir Collage.

I really appreciate that you took time to stop by.  You're an important part of my happy holidays!


Tuesday, December 6, 2022

Double D Challenge: Christmas Stockings


Hello friends!  We're kicking off another Double D challenge today.  This time around Diane is asking us to show our Christmas stockings.  That sounds like fun, doesn't it?  Here's a cute board for inspiration:


I'm back to my Power Poppy stamps for this one.  Gee, look at that sunshine in the photo.  As of this writing it's been rain rain rain for several days.


The brick is supposed to represent the edge of a fireplace.  The boughs and bow are decorating the mantel.  I think it was kind of a good idea, but I definitely see things I'd do differently.  A lot of my Christmas cards this year could stand a do-over, sigh.  It's a cute stocking, though, isn't it?


Speaking of cute stockings, check out the prize for a random winner.  How fun!


The team votes on creative winners -- not an easy task, I tell you.  We always have the most awesome entries and it's a treat to look through the players gallery.  I hope you can join us.

In the meantime, enjoy all the team's samples on the Double D blog and say hello while you're there.  Happy holidays!


Stamps:  Power Poppy Fully Stocked clear stamp set (retired)  Paper:  Fabriano Artistico Extra White 140 lb hot press watercolor for stocking, Neenah Classic Crest Super Smooth solar white 110 lb card base, SU  gray sand-able cardstock (retired), scraps red & green cardstock, scrap wood grain designer paper  Ink:  Palette Noir, SU Poppy Parade  Coloring:  Tombow markers and blender  Other:  Anthology Blizzard (white) dimensional crystal, glitter, Wink of Stella, enamel dots, Sizzix Brick Wall embossing folder, Impression Obsession Pine Pair, Poppystamps Prim and Proper Bow, foam mounting tape


Thursday, December 1, 2022

Mintay Makes the Christmas Cards

Hi again and welcome to December -- yikes!  I'm surprised to have a second post this week, but Mintay made me do it.  I have a passion for designer paper as one peek inside my paper cupboard will reveal .  I try not to play favorites when it comes to the paper, but there's quite a lot of Mintay inside that cupboard.  Sometimes you just have to let the art of the paper shine.

I used one 6x6 sheet plus scraps to make two mini-slimline cards.  The first card shows a slice off the bottom of one sheet, stitched with a border from a scrap piece.  I added a Cottage Cutz banner with sentiment.  The deer/snowflake banner is one layer, the sentiment is two layers for dimension.  I sponged the sentiment with SU's Close to Cocoa ink.


The next card shows the top 3 1/2" of the same sheet of Mintay paper.  It has a sentiment banner printed on the paper so I didn't need to add my own.  However, I did add a hand cut ephemera piece backed by a die cut doily and patterned circle.


The first card is definitely my favorite.  I made two of each design, trying to use up this Mintay pad which I've loved well over quite a few years.

I hope we can visit again soon.  Take good care of yourselves so you can stay well and enjoy the holiday season.


Paper:  Neenah Classic Crest Super Smooth Solar White (80 lb for card base, 110 lb for dies), Mintay Christmas Stories designer paper  Ink:  SU Close to Cocoa to sponge sentiment die cut on first card  Dies:  Cottage Cutz Seasons Greetings w/Banner, Cheery Lynn French Pastry Doily, Memory Box Stitched Circle Layers

Sunday, November 27, 2022

Hooked on Lavinia Stamps

Hi everyone!  I hope you all had a good Thanksgiving (in the US), a safe Black Friday and Small Business Saturday and are onto a successful Cyber-Monday.  I stayed home for all of it and spent a little time getting acquainted with my new Lavinia stamps.  As the title of this post indicates, I'm totally hooked on them!

Pictured below is my favorite piece so far.  All the color... sigh.  I keep watching videos and learning more each time.  My Lavinia collection is limited, but I guarantee it will grow.


My scene was made on a semi-gloss cardstock.  I'm not sure what it's called or where to find it as it was a friend share.  It sure was nice to work with.  I cut a circle mask for the moon, then blended SU Vintage Violet and Purely Pomegranate for the sky.  The snowy landscape is made with torn paper masks and a combination of SU Always Amethyst and Lovely Lilac.

About the moon -- I mentioned the circle mask, but I also stamped a Lavinia moon stamp inside the circle after the sky was blended.  I applied light pressure in SU Lovely Lilac and achieved a very subtle and natural look.  The masked circle is larger than the stamp, but I added shading around the edges so you don't notice.  I'll try different colors and ideas with this and have infinite fun as I go along.


After blending the sky I added water splatters, then white acrylic paint splatters.  The nature of Lavinia stamps give rise to all kinds of whimsical  possibilities.  There are so many ideas I'd like to try.  Not selling, just saying.  

This is a winter scene, but not a Christmas card.  I'll share in two challenges today:

Sisterhood of Crafters -- Anything Christmas or Winter
NBUS Challenge #44 -- Never before used schtuff.  My Lavinia stamps are NBUS.


Back to a busy week after a few somewhat quiet days.  I'm in pretty good shape for Christmas, but there's a whole lot of other life stuff to take care of, too.

Wishing you a beautiful day!


Stamps:  Lavinia 431 Moon, 482 Whimsical Hares, 492 Small Fairy Fir Tree 2, 489 Small Fairy Fir Tree, 505 Spanish Moss Foliage, 524 Forest Scene (2nd card); Power Poppy sentiments  Paper:  Coated semi-gloss white cardstock (source unknown at this time, 1st card), Neenah Classic Crest Super Smooth Solar White (2nd card)  Ink:  SU Purely Pomegranate, Vintage Violet, Lovely Lilac, Almost Amethyst (1st card), Memento Tuxedo Black and London Fog, SU Bordering Blue, Versamark (2nd card)  Other:  White acrylic paint, Alene's Tacky Glue watered down for splattering on 2nd card to hold glitter, glitter, white embossing powder, spray matte sealer to keep glitter splatters from brushing off, stencil from collection of 30 purchased at Amazon (2nd card)

Wednesday, November 23, 2022

Happy Thanksgiving!

I'm sending something soft and sweet to wish you a happy Thanksgiving tomorrow.

Someone once told me that big dogs aren't cute.  Well, I'm here to tell you that not only are big dogs cute, but big old dogs are cute!  Wally brought the ducky over to entice me to play with him and, of course, LuLu wanted to be part of the game as well.  She will always wait for Wally to share, which he does quite generously.


Not as cute as Wally and LuLu, but thought I'd share this pic as well.  The neighborhood is always visited by a rafter of turkeys in November.  Yes, a rafter.  So named because they like to roost in the rafters if available.  We don't have rafters so they roost in the trees.  These three were in a small group that paraded through the yard.


Back to stamping next week.  Enjoy your day!


Monday, November 21, 2022

Poinsettias and Snowflakes

Hi there!  Back to the Christmas cards.  I've already started getting them ready to put in the mailbox but I'm short by half.  Those that need to go the longest distance are mailed first, closer destinations are the last to go and probably aren't even made yet.  I need some quick cards.  Today's cards were almost quick.

I was inspired by Michele's cards here.  I didn't have as large a poinsettia and in the end my cards bear little resemblance to her gorgeous originals, but that's the way of inspiration -- you never know where it will take you.  There's a list of supplies (nothing new) at the end, so I'll mostly just share pictures.  All cards are the same layout (again, different from Michele's).  I'll show the full cards here:


Designer paper scraps create the foundations.  The red poinsettia was cut from an unattractive piece hidden away in my bag o' backgrounds.  Inks on glossy paper with some butterflies stamped on it.  Sounds nice, but looked rather hideous until I turned it into a poinsettia.  Now I like it.  The banner edge is the same.


The next is pink ink sponged on white cardstock.  The white paint splatters went wrong from the start, but we'll call it "art" and be happy about it.


I switched to snowflakes for the next two cards.  Only cropped photos of these because they're the same layout as the poinsettias.  The purple card uses the oldest snowflake dies in my collection -- Spellbinders Create-a-Flake-Five.  I'm loving the Pink & Main Glossy Dots all over again.


The next uses Cottage Cutz snowflakes.  A split background in this color competed with the snowflakes so I left it solid.


The split background is a go-to layout.  For these I cut a white panel 3 1/2" wide.  Any length works.  Mine are 2 7/8".  I glued the 3/4" strips to the white panel and then glued that onto the card.  It's easier to keep the strips straight that way, and the panel gives just a tiny touch more dimension to the design.

This is Thanksgiving week here in the US.  The grocery stores are crazy so I'm "thankful" to be all stocked up.  Wishing a happy Thanksgiving to all who observe it, and a happy everything to everyone else!


Stamps:  Lawn Fawn Winter Wavy Sayings  Paper:  Neenah 110 lb white, SU Pink Pirouette, glossy white, various older designer papers  Ink:  Various for sentiments, forgotten colors for glossy Poinsettia  Dies:  Poppystamps Stitched Poinsettia Trio (2016), Cottage Cutz Snowflakes Set, Spellbinders Create-a-Flake-Five, Lawn Cuts (Lawn Fawn) Fancy Wavy Banners  Other:  Pink & Main Glossy Dots


Tuesday, November 15, 2022

Double D Challenge: Hot Drinks


Hello friends!  Back to Double D fun today!  Darlene is challenging us to do something with Hot Beverages and has given us a warm and delicious mood board for inspiration.


I don't have a lot of beverage stamps, but I do have a favorite oldie that I pulled out for this challenge.  I chose a fall theme and warm colors along with an old JustRite sentiment which is, well... just right.


Whenever possible I'm making an effort to work with my vast hoard of designer papers.  These were a friend share, not labeled, so I don't want to hazard a guess as to who made them.  They are beautiful and have been hoarded too long.  The wood grain piece is printed with leaves and flowers, but I covered the flowers with die cut leaves for a more fall-ish look.  The dies are Spellbinders oldies, except for the Hemstitch frame.  By my standards it's new.

Lots of oldies here, including me, ha!  Hey, I was young when I started blogging.  Has it really been that long?

How about popping over to the Double D Hot Beverages challenge to see some inspiring samples.  I hope you'll enjoy playing along!


Stamps:  A Muse Three Cups, JustRite A Warm Hello set  Paper:  Fabriano Artistico Extra White 140 lb hot press watercolor, SU Perfect Plum textured, scraps black, designer paper (Our Daily Bread?)  Ink:  Palette Noir, SU Kiwi Kiss and Close to Cocoa  Coloring:  Tombow markers and blender  Other:  1 1/4" circle punch, Sizzix Leaf Veins 3d embossing folder, Spellbinders Hemstitch Rectangles and Floral Flourishes


Thursday, November 10, 2022

Peony Rose on Black

Hello again!  I've had my first try at watercolor on black.  I bought a 5x7 pad of Stonehenge coldpress -- not too much to start just in case it turns out I don't care for it.  It's too soon to tell at this point.

For my first go I pulled out my Lisa Horton 3D Peony Rose Stem embossing folder and embossed a black panel.  I used my Twinkling H2O's to paint the raised areas of the image.  It's just plain old painting, no shading.  I'd forgotten what a difficult time I have seeing details in black, but I kept on till the end.  


The Twinks did an amazing job of covering the black so now I know I don't need to rush out and buy more metallic paints.  I love those little pots of paint!  I used my water spritzer bottle to spray water directly into the pots, then dipped my brush into the pot and proceeded to paint without any additional water.  After the paint was dry I slipped the panel back into the folder and embossed again.

I splattered with gold and added a gold embossed sentiment and a gold border at the lower edge.

The  4 1/2" x 6" card base is SU's retired Orchid Opulence, still one of my favorite SU colors.  I embossed the entire folded card base with SU's Subtle 3D folder.  It makes plain cardstock look so much prettier.

It's very difficult to show dimension on black, but I tried in the photo below.  It's also a trick to photograph metallic shine.  I was fortunate to have some sunshine coming through the window to help with all that.


This was probably not the easiest project for my first time out.  A gold or white embossed open line stamped image will be my next try.  I had a gold-embossed test piece on the side and I found that the full strength Twinks (metallic paints) obliterated any gold embossing they came in contact with so I know to be careful about that.  It's not the same as using regular watercolors that do not stick to embossing.

Anyway... more to follow with this technique later.  Any time spent in my stamp room is good time, so I'm happy.  See you again soon!


Stamps:  Birch Press Contempo stamp and die set  Paper:  Stonehenge Legion 140 lb coldpress watercolor, SU Orchid Opulence, scrap gold mirror cardstock  Ink:  Versamark  Coloring:  Watercolor with Twinkling H2O's  Other:  Lisa Horton Peony Rose Stem 3D embossing folder, SU Subtle embossing folder, Ranger Princess Gold embossing powder, foam mounting tape to pop up sentiment

Sunday, November 6, 2022

Delicate Asters for The Flower Challenge

Hi friends!  I'm stamping with the oldies for The Flower Challenge today.  It occurred to me that asters are a fall flower so I was pulled in the direction of Heartfelt Creations Delicate Aster Vase (retired).

I've always been especially fond of the wild asters that bloom along the trails in the fall.  Using Tombow markers and homemade blender I've colored my asters the impossible shade of blue that lives in my memory after their season passes.  Much of the subtle shading on the wood grain background and the vase got washed out in the photos, tsk tsk.  There is simply too much contrast between the soft grays and the intensely colored flowers for this photographer.


The 3 1/2 x 6" card base is made of folded designer paper from the Delicate Aster collection.  I lined the inside so it's nice and sturdy as well as pretty front and back.  The olive green mat is glued flat and the image panel is popped up.

I didn't feel there was need for a sentiment on the front.  The clear gems were just enough and, after all, The Flower Challenge is asking for embellishments.  A closer look:


The Flower Challenge #74 -- Add embellishments


As I write this it's a very dark and rainy day -- perfect for staying home and stamping.  However, I think we're going grocery shopping, darn it.  Duty calls.  If I want to make any of the new recipes I've selected I'll need a few things.  Enjoy your day!


Stamps:  Heartfelt Creations Delicate Aster Vase (retired)  Paper:  Fabriano Artistico Extra White 140 lb hot press watercolor, SU Old Olive, Heartfelt Creations Delicate Aster designer paper  Ink:  Palette Noir  Coloring:  Tombow markers and homemade blender   Other:  Clear rhinestones, foam mounting tape

Tuesday, November 1, 2022

Double D Challenge: Thankful - Blessings - Grateful


Hi there!  It's time for another Double D Challenge.  It's Diane's turn to put forth the challenge and she has given us a beautiful autumn board for inspiration.  The theme is Thankful - Blessings - Grateful, so do keep that in mind when you create.  It doesn't have to be a Thanksgiving card as there are many occasions for thanks, blessings, and gratefulness.


I saw the jar of autumn leaves in the lower left corner of the board and was immediately reminded of an older Power Poppy stamp set called Feeling Fall.  The clear stamp set is retired, but there's a digi featuring the boot and more here.


I stamped the gourds and coffee mug on watercolor paper, then masked and stamped the boot behind them.  Coloring was done with Tombow markers and homemade blender pen.  I've used some of my oldest autumn designer papers for the background.  I never did have a lot of this paper, but it seems to go on and on.  I stitched up the image panel, punched circles for the sentiment, and added some hand cut leaves for accent.

My "grateful" and "blessed" are on the inside of the card:


You know how it works:  The team votes on creative favorites and a pretty great prize goes to a randomly drawn winner.


I hope you'll come play with us at Double D!  Check out the team's cards then use your imagination to create with the theme.  We'd love to see you in the gallery.  Have a great day!


Stamps:  Power Poppy Feeling Fall, SU Itty Bitty Backgrounds, Crafter's Companion Thankful Words, Impression Obsession Grateful for You  Paper:  Fabriano Artistico Extra White 140 lb hot pressed watercolor, CTMH Vineyard Berry, SU Almost Amethyst, scraps designer paper  Ink:  Palette Noir, SU Lavender Lace  Coloring:  Tombow markers and homemade blender  Other:  1" & 1 1/4" circle punches, SU Subtle Embossing folder, stitching