Monday, June 29, 2020

Happy Songbird

Hi, there!  I'm getting a late start on the week again... always with so many big ideas and not enough time for all of them.  Know what I mean?  I'm sure you do.

I have a happy card today and it's with a brand new-to-me Penny Black stamp from the adorable set called Songbird Celebrations.  It's dated 2020, but PB has so many new releases I feel like this stamp is already old.  I've got a thing for bird stamps, and all the better if they're cute, whimsical birds that can be colored any old which way.  


Keeping it simple, I sponged Peacock Feathers and Twisted Citron distress inks on a 110 lb white card base.  Splattered with water, then added some green sprinkles.  Placed my colored and fussy cut image as shown.  The sentiment is from another Penny Black set called Be Happy.


I hope this card makes you feel happy.  It worked for me!  Hugs! 


Friday, June 26, 2020

Cherry Sweet Thoughts

Hello, again!  Popping in with the one other bit of coloring I accomplished this week -- a Power Poppy digital stamp from the set called Cherries and Berries.  My cherries look a little moody today, but this set really is so sweet and pretty and perky.  The thing is... this is the last of my coloring on Cryogen ivory cardstock.  For this one I applied a ripple filter to the image before printing, and then used my Copics in a smooshy manner, like smooshy pointillism.


Yes, I know... it has a weirdly stylized look.  Still not crazy about this paper for Copics.

To cheer up my moody cherries I added a sentiment from a retired clear set and accented with gingham paper and a striped faux enamel dot.  The faux enamel dot is made with two 1/4" punched circles -- one of 110 lb cardstock and one of striped designer paper.  Glued in place and coated with Glossy Accents. 


If you want to see some pretty fabulous cards, check out these by my Power Poppy teamies:


Thanks so much for your time.  Now go forth and enjoy the rest of your day!


Wednesday, June 24, 2020

Picture Perfect Sloth

Hi, there!  I'm happy to see you again this week.  I thought I might skip blogging this week in exchange for simply coloring, but that didn't happen.  How is it that the weeks go by so quickly?  I've been outside planting flowers rather than sitting at my coloring table or the computer.

Nevertheless, I did finish one card.  It's a quickie and a cutie.  I've had this MFT Picture Perfect set for over a year and I've only colored one of its six image stamps... Wait... what?  How is it that the years go by so quickly?  I guess my stamp buying spree goes back further than I thought.  Still trying to catch up.  Will it ever happen?


I made this clean and simple -- bright on white with some cute and glittery die cut leaves and a punched heart.  I'll list everything below.


I'll be coloring more of this set soon, seeing as how I stamped it all out so it would be sure and get done.  It's too cute to leave it lay dormant.  Why do we do that?  This post is full of questions, isn't it?

I'm playing along at NBUS Challenge #15 with my never before used sloth.


Thanks for coming to visit!  Have a great day!


Stamps:  MFT Picture Perfect  Paper:  Neenah Classic Crest Super Smooth Solar White 80 & 100 lb, DCWV Animal Crackers matstack (dated 2008, sheesh!)  Ink:  Memento Tuxedo Black  Coloring:  Copics  Dies:  MFT Die-namics Wild Greenery and MFT Die-namics #Captions  Other:  Heart punch, linen thread

Friday, June 19, 2020

Dahlia Display

Welcome to Friday!  It's a Dahlia kind of day, I think.  It sure felt good to watercolor some flowers this week.  I'm sharing Power Poppy's Dazzling Display digital stamp watercolored with Tombow markers on Fabriano Artistico 140 lb extra white paper.


Keeping it simple, I matted onto SU Lovely Lilac to match the dahlia, then glued flat to a white card.  One of the sequins is covering up a smudge on the sentiment.  My printer ink is great for watercoloring IF I lighten the image first.  I printed the flowers in no-line and the sentiment full strength.  I thought I was being careful, but apparently I dripped some water on the sentiment.  I wasn't able to correct all the smudges, but the sequin helped a little.

There's more to see here:

Broni Holcombe
Lisa Johansen

That wraps up the week here, friends.  I'll be back next week if cards happen.  Take good care of yourself!


Wednesday, June 17, 2020

Roses on Floral

Welcome back!  I'm glad you came.  I have another card made with UFOs (unfinished objects).  Lately I've been trying to use them in combination with my NBUS (never before used schtuff), but today it's all UFOs.

The roses were stamped on watercolor paper and colored with Prismacolor pencils and odorless mineral spirits.  Just trying the paper/pencil combination with a very old Hero Arts stamp which I still love.  I decided to let the image stay simple because, truthfully, I like it as is with no background shading or artsy stuff.


In the background is the retired SU Floral background stamped in SU retired Gable Green.  All these things are old favorites.  Even the die I cut the background panels with is an oldie but goodie.  The image and stamped background were both in the drawer.  I simply die cut and put them together.  Very CAS and fun for a change.

Linking again to the challenge that inspired me:


Details are summed up below.  Thanks a bunch for stopping by!


Stamps:  Hero Arts Posy Prints, SU Floral background  Paper:  Arches 140 lb hot press watercolor for focal image, SU Whisper White for Floral background, textured white for card base  Ink:  Memento London Fog and Tuxedo Black for focal image, SU Gable Green for Floral background  Coloring:  Prismacolor Pencils  Dies:  Spellbinders Scored and Pierced Rectangles, Spellbinders Long Classic Rectangles  Other:  Rhinestones, Scotch brand foam mounting tape

Monday, June 15, 2020

Ranunculus Under Vellum

Hello, friends!  It's been a week or so since I did much of anything in my room and that's only because other projects around home needed attention.  When I think about all the stamps and dies waiting for me...
  😢

Then I saw this post by my friend, Maria.  Seriously, you have to see how many colored or partially colored images she has in her pile.  I have two very small drawers of UFOs (unfinished objects), but only 3 colored images I've been on the fence about.  Well, I was inspired to make some very CAS cards, one of which I'm sharing today.


The UFO is the colored image already die cut with vellum glued over top.  The Thinking of You die cut was also in the drawer.  You know how it is... an idea I was playing with that I wasn't sure I liked enough to turn it into a card.  If only the vellum hadn't been cardstock weight.  Turns out I like it just fine and it's already in the mail.

So now I'm linking to the challenge:


Card details are listed below.  Thank you for visiting.  Have a happy day!


Stamps:  Power Poppy Ranunculus digi set  Paper:  X-Press It for image, wood grain textured cardstock for base, cardstock weight vellum, black  Ink:  Printer  Coloring:  Prismacolor pencils  Dies:  Spellbinders Thinking of You Woodland Scene  Other:  Rhinestones, Scotch brand foam mounting tape

Monday, June 8, 2020

CAS Christmas Bells

Hello!  It's a new week and after a rainy weekend I have a new card for my Christmas box.  It's not much of a showing for a whole weekend, perhaps, but I've had trouble staying focused with all there is to think about in our world right now.  It helped that I recently bought a die which is perfect for the CAS Christmas Card Challenge where they're asking us to feature bells.


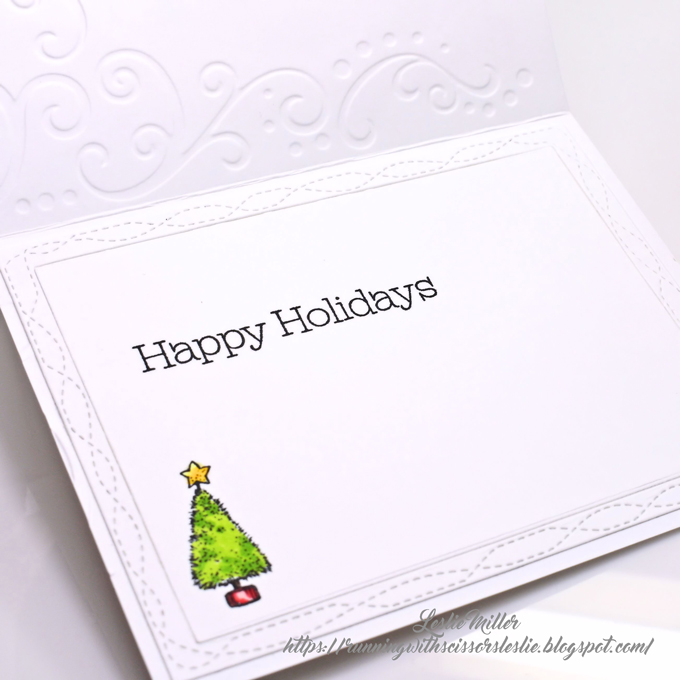
Clean and simple is key in this challenge, so my card has a lot of white space and was very quick to make.  Love the pretty bells die.  I cut one each of red and white and layered slightly offset so it would stand out.  An embossed card base and stitched frame die add texture, and the sentiment adds color and fun.


When I embossed the card base I inserted the whole card in the folder so the embossing shows throughout.  In the photo below you can see the debossed inside front and the finished message area.  The back of the card shows the debossed pattern, too.    It's a simple step that adds a nice touch.


Have you been trying out the new Blogger?  We'll all be switched later whether we like it or not, so I've been working with it and figuring out a little more with each post.  There are certain things that seem wonky to me, but there may be a trick I haven't figured out yet.

One last note:  My heart has been rather heavy since my blogging friend, Sherri, went to live in a Memory Care home.  Her grandson created a website to sell Sherri's stamps and dies at a huge discount and there are currently 17 pages to leaf through.  It appears more things are added now and then.  She would love her stamps and dies to be used and loved by those of us in the stamping community.  Visit my dear friend's website here:  The Crafter's Estate

Take care, friends, and keep looking up.


Stamps:  Uptown (old) sentiment on front, SU sentiment with Power Poppy Merry Littles tree inside  Paper:  Neenah Classic Crest Super Smooth Solar White (both 80 and 110 lb), SU Real Red  Ink:  Memento Tuxedo Black  Coloring:  Copics  Dies:  Amy Design Christmas Bells Corner, Memory Box Wrapped Stitch Frames  Other:  Darice Corner Scroll Background embossing folder, Scotch brand foam mounting tape to pop up bells die

Friday, June 5, 2020

Single Zinnia

Hello and welcome!  I'm glad you could join me today.

I've colored a big flower that I hope will inject a little cheer into your day.  It's Power Poppy Zinnia Parade digital stamp.  It struck me that this digi set is just the sort of happy coloring my heart needs right now.  Easy, cute, fun!  It's also another experiment with my Cryogen Ivory cardstock.  I used Prismacolor pencils again, but this time I blended with Gamsol odorless mineral spirits.  Sorry Cryogen, but I can't make myself love you, tsk tsk.  I have one more digi printed on this paper and I'm not sure what to try next.


Red gingham sure has a way of adding a homespun look to a card, doesn't it?  The card base with patterned paper was already made and sitting in my card parts drawer.  I have quite a variety I've made up, then changed my mind and tossed them into the drawer... now I'm trying to make a point of using them.  This old paper seemed just right for my Zinnia!


Part of the difficulty with Cryogen paper is getting an adequate photo.  It has a shimmer which reflects light aka glare.  The picture below gives you an idea of the shimmer, but it's actually barely noticeable to the naked eye.


Well, that's it from me this week.  For something really pretty have a look here:


Thank you for your time today.  Wishing you peace and love.