Monday, December 14, 2020

Two More for Christmas

Hello and happy day to all!  In spite of the new order of things due to COVID, this is still a busy time of year.  I've been totally focused on getting the Christmas cards finished and in the mail (I waited too long!), but I believe they're all done now.  Today's cards are the last of them.

Altenew emperor penguins with a Power Poppy sentiment is up first.  I made three of these.  I dearly wanted to add white snow splatters, but then I thought about how rarely it snows on Antarctica, so I left them off.  Silly of me because it would have been so much prettier, I think, and when you're the card maker you can do anything you want, right?  Next time they're getting snowflakes!


(Stamps:  Altenew Warm Hear, Power Poppy Simple Joys sentiment  Paper:  Neenah Super Smooth Solar White  Ink:  Memento Tuxedo Black, Wendy Vecchi Archival Watering Can, DOX Abandoned Coral and Salty Ocean  Coloring:  Copics  Other:  Elizabeth Craft Warm Diamonds microfine glitter, 1" circle punch, Poppystamps Snowflake Ribbon die)

I'd planned on making multiples of the next card, but in spite of letting the designer paper do a lot of the work, the die cut sentiment made it far too time consuming.  I'll come back to this paper with a different idea later.  Turns out this is one of my favorite cards this year.  Love that Mintay designer paper!


(Paper:  Mintay Christmas Stories designer paper, Neenah 110 lb white  Other:  Amber gems, Wink of Stella on snowflakes  Dies:  Memory Box Warm Christmas Wishes and Bauble Snowflakes, Impression Obsession Small Snowflake Set, Marianne Designs Anja's Oval)

I'll be playing in my room, making cards and backgrounds and just generally having fun... when I have time... so I may pop in again before Christmas.  After all, there are still 11 days left...  Happy holidays, everyone!


Wednesday, December 9, 2020

Cottage Cutz Christmas

Hi, there, and welcome back for more Christmas cards today!  I'm showing two different cards, both made with Cottage Cutz dies.  The first was the easy peasiest thing ever because I pulled the smooshed watercolor background from my stash.  It was not so pretty as a whole sheet, but as a cut down piece I love it.  I made two of the first design.  Note to self:  Make lots more backgrounds for my stash.


(Cottage Cutz Moose & Pine Trees)


I made only one of the next card as it was a little more involved.  I wanted it to be simpler, but it just didn't happen.  Minimal coloring, ancient designer paper, Wink of Stella for shimmer (not that you can see it in the photo).  The frame is a spare part -- a negative left over from cutting an oval.


(Cottage Cutz Snowman w/Animals, Impression Obsession Small Snowflake Set and Let it Snow)


I hope to be back by Friday with a batch of Christmas cards, but it remains to be seen.  I'm getting cards in the mail each day, but US mail has been iffy so I sure hope they arrive by Christmas.  I've been receiving cards -- thank you, friends.  One of the cards took 12 days to travel from the midwest to here (west coast), which is a trip that previously took only 4 days.

Take care, be safe, hang in there, things will get better.  Merry everything!


Monday, December 7, 2020

Bentley's Joyous Wishes

Hello on a Monday, friends!  You're probably doing way better than me, but I feel as though I can't get another single thing done until I finish my Christmas cards.  By day I create, by night I address and write up cards for the mail.  Actually, I don't spend all day and all night on cards, but it's on my mind a lot.

Today's card is Bentley by Whipper Snapper.  I made four of these, all the same, inspired by two challenges which I'll list at the end.


Super easy and quick coloring with Tombow markers, no water.  These markers blend so easily when using marker on marker.  Much easier than Copics and just the ticket when I'm in a hurry.  Bentley's hat is trimmed with Viva Decor Ice White Pearlen Pen (similar to Liquid Pearls), then sprinkled with microfine glitter.  The one gold glittery star completes my nod to holiday sparkle.


It was Double D's Santa Hats Challenge and their cute mood board that made me think of Bentley, so he's heading over there to spread holiday cheer.

Bentley and I are also playing along with Retro Rubber Challenge #149.  Older stamps are required, and Bentley and the sentiment are both several years old.  For the current challenge we are to use the photo for inspiration (see below).  I made sure to include red and green as well as pine boughs, plaid stars, and a stitched mat. 


I'm listing card ingredients below, but a lot of these things are no longer available.  We're all just having fun, playing with our stuff, right?

That's all for today!  I'll be back with more Christmas cards this week.  Happy holidays!


Stamps:  Whipper Snapper Bentley, Hero Arts Wishing You a Joyous Christmas  Paper:  Neenah Super Smooth white, Fabriano Artistico Extra White 140 lb hot pressed watercolor, textured green, SU Real Red, gold glitter, Memory Box Christmas Plaid designer paper  Ink:  Palette Noir for Bentley, Memento Tuxedo Black for sentiment  Coloring:  Tombow Markers no water  Other:  Viva Decor Ice White Pearlen Pen, Elizabeth Craft Warm Diamonds microfine glitter, Taylored Expressions Stitched Rectangle Stacklets and Ric Rac Borders, Sizzix Primitive Stars, Impression Obsession Pine Pair


Wednesday, December 2, 2020

A Birthday Linky Party for Susan

Don't fall out of your chair!  I do not have a Christmas card or even a fall card today.  Instead I have a very springy-looking card for the lovely Susan (Cardmakers Garret) in celebration of her 70th birthday.  Hey, it's a milestone so Loll has organized a linky party on her blog.  All are invited to send a virtual birthday greeting to Susan by linking up a card.


My card is simple and quick.  Stamped and embossed the flowers first, then stenciled an area which I'd masked off with tape.  I did not mask the flowers, but carefully applied ink through the stencil with a very small brush.

The next step was to watercolor with Twinkling H2Os.  Maybe you can see some of the twinkle in the next photo.


I think this sentiment is just the nicest thing to say.

Since this is a first time use of the flowers, sentiment, and stencil I'm also sharing at Darnell's NBUS Challenge #21.


See a quick supply list below my signature.  Wishing everyone a happy day, and Susan a very happy birthday month!


Rubbernecker Brushed Flower #7 and Smiles and Thinks of You
Altenew Ombre Stripes Stencil
SU Inks Barely Banana, Bashful Blue, Certainly Celery
Watercolor with Twinkling H2Os on Fabriano Artistico Extra White 140 lb hot press watercolor paper


Monday, November 30, 2020

Cozy Cabin in the Woods

Hello, friends!  After a few quiet and restful days I'm back to the blog.  The race is on, now, to get the Christmas cards done.  I'll start mailing to the more distant destinations, work my way closer to home, and continue making cards all the while.  I always say, "next year I'll be all done by December".  Right.

Today, I have a snowy scene made with the new Cuddle in the Cabin clear set from Power Poppy.  It's a semi-slimline, measuring 3 3/4" x 6 3/4" -- one of my more frequently used card sizes.  Lots of tiny stars courtesy of a white gel pen, including the Big Dipper, which may be difficult to make out unless you know it's there.  Just having fun.


I stamped on Neenah super smooth white with Memento London Fog and colored with Copics.  Where I felt it necessary I added more detail with a gray fine tip marker -- SU Going Gray water based.  After coloring I sprayed the image panel with glitter spray.  It's very fine and doesn't show well in the photo, but is lovely IRL.


Keep an eye on the Power Poppy Blog for Christmas festivities planned by Marcella and some of the team.  I'm sitting this one out, but I'll be peeking.  I'll see you back here as soon as possible.  Take care!


Stamps:  Power Poppy Cuddle in the Cabin  Paper:  Neenah Classic Crest Super Smooth Solar White, navy Bazzill textured  Ink:  Memento London Fog and Tuxedo Black  Coloring:  Copics  Other:  Signo Uniball white gel pen, craft glitter spray


Monday, November 23, 2020

Woodsy Christmas

Hi there!  It's Thanksgiving week here in the US and I'm hurrying to write this so I can run off to do some grocery shopping.  We're keeping it small and simple with only our son for company, but a special meal and desserts are a must, don't you think?

At the same time, I'm still working on Christmas cards.  I wasn't able to be in my room at all for a couple of days, so I was trying for something relatively simple to make up for lost time.  I used some new to me dies and came up with a rustic, woodsy card, which is my favorite look for Christmas.


My favorite Christmas paper does a lot of the work.  The stag is two layers of white and one of red, giving it nice dimension on the wooden disk.  I let the white show for highlights and better contrast against the disk.  The disk was cut in ivory and sponged with inks.  Added gold gems for dress up.  I'll list everything in the recipe at the end.


I made four of these, which didn't take long at all once I decided what I wanted to do.  There are miles to go yet before I call my Christmas cards done.  How about you?


The wooden disk and stag dies are fresh out of the package, so today I'm remembering to join the fun at Darnell's NBUS Challenge #20.  Thanks, Darnell!


I love when you all come to visit, so thank you for that.  I never forget to be grateful for my blessings.  Have a beautiful week!


Stamps:  Retired SU Glad Tidings  Paper:  SU Cherry Cobbler, Naturals Ivory, Neenah white card base (under DP), Studio Light Woodland Winter  Ink:  SU Real Red, Close to Cocoa, Adirondack Sandal  Other:  Cottage Cutz Stag w/Poinsettias, Impression Obsession Wooden Disk, Honey Bee Autumn Afternoon Gem Stickers


Saturday, November 21, 2020

Penny Black Saturday Challenge Reminder

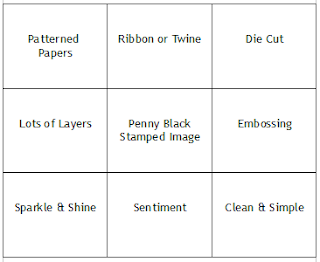
Hello!  I'm back with a reminder of the Penny Black Saturday Challenge.  It's open till December 4 at 8:00 pm GMT, so there's still time.  It's always anything goes with Penny Black products, but there's also an optional theme -- this time it's a Bingo or Tic-Tac-Toe board.  See the challenge blog for full instructions.


I followed diagonal top left to bottom right.  My patterned papers are DCWV Fall Forest, the Penny Black stamp set is Hello Pumpkin, and I did my best to keep this clean and simple.  I surgically split the sentiment, which originally said "hello pumpkin".  It's cute for a child, but not something I'd say to a girlfriend.  Someday the "pumpkin" word will come in handy, but not this time.  By the way, I'm using this as a Thanksgiving card.  One of very few I'll be making this year, sniff sniff.


I don't know how many of you remember SU's slot punch, but that's how I made the deep scallop border.  Stamped in Memento Tuxedo Black and loosely colored with Copic markers.  I hand drew the pumpkin segment lines because my coloring looked too flat without them.

I added a lot of sparkle to this with Wink of Stella and Stickles.  Even with the large photo below you can't get the full effect.  You can definitely get a good look at my goofy coloring.  Just having fun.


Busy stamping times for me.  How about you?  I want to play with fall stamps, but Christmas cards are calling my name.  Whatever you do, I hope you enjoy it.  Come play with us in the Penny Black Saturday Challenge.  Pretty sure you'd enjoy it.  Take care!


Wednesday, November 18, 2020

Lino Cut Wren and Framed Trees

Hello again in this busy card making season!  I'm doing my best to use my newest Christmas stamps, but some may have to wait till next year.  I did, however, want to have a play with my Woodware lino cut stamps, starting with Wren.  This was the stamp that caught my eye on Pinterest and set me on a Woodware lino cut journey.

There are actually 4 stamps in this set -- wren, sky, small tree, and sentiment.  So incredibly quick to make a card like this.  The image stamps crisply, but I did several stampings just for good measure.  SU Bashful Blue and Brilliant Blue inks with Brilliant blue cardstock for the base.  The stamping was done on SU Whisper White.  The snowflake die is one of three that popped out of the background.  Added a rhinestone, popped up the sentiment.  The square card is 5".


(Memory Box Stitched Circle Layers, Amy Design Keep it Cool Rounded Frame, Spellbinders Fancy Framed Tags One)

That was so easy I made another one, this time in SU Almost Amethyst and Lovely Lilac.  Stamped on Neenah Super Smooth, which is nice, but the image is more crisp on SU Whisper White.  Each paper has it's own value and purpose.  I love to color on Neenah, but cannot color well at all on Whisper White.  See more info below pic.  Can you see the texture of the lilac card base?  That's done with SU's Subtle embossing folder.  Love that thing!


(Precious Marieke Snowflake Border, Impression Obsession Small Snowflake Set, silver self-adhesive trim, rhinestones)

The next cards are made with a Woodware lino cut called Framed Trees.  Sorry, no link, but I have to tell you I had a little trouble getting a good impression with this one.  I tried first with the MISTI, then my old SU Stamp-a-Ma-Jig.

Best results came by stamping with Versamark and embossing -- that's the gold and black card.  I used my own embossing powder mixture which is rather chunky with gold and silver, something glittery, even a little yellow.  I've forgotten everything I put in it.  Just playing, you know.  Some of the stamp's detail was obliterated by the chunky powder, but still looks pretty cool (more so in person).  After I embossed the gold on black I let it cool and then smooshed with Versamark and embossed with clear powder.  A nice glaze.


The blue card is my first time to try embossing Distress Oxide inks.  It worked great, other than the parts of the stamp that did not impress well no matter how many times I stamped over.  I used Peacock Feathers.  One die cut snowflake partially covers the most flawed area, the other two snowflakes are just for show.

This is a lot in one post, I know, but I tried to be quick about it.  I'm in a rush to get Christmas cards done and still do my other stamping, as well.  It's all fun for me!  I hope you're enjoying your holiday season, even though things are a little weird this year.  Hugs all around!


Monday, November 16, 2020

New Power Poppy -- Joy to the World Bouquet

Marcella saved her beautiful Joy to the World Bouquet for last.


If you love to color, this one is a dream.  Remember, all the new stamp sets are available in digital format, too, and those can be enlarged and cropped to create lots of room for a watercolor brush or a Copic nib.  Once again, I'm representing the physical stamp set here.  You can see it's quite a nice size, filling up this A2 card beautifully.  I cropped just a little bit off the top and one edge.


I colored with Copics and trimmed the edge with plaid and a self-adhesive strip of gold.  Scattered some gold sequins and done! 


And that wraps up Collection #2 of Marcella's Quiet Christmas release.  It was, as our Stacy put it, quite a Christmas release!  Visit the Power Poppy Blog for more information and gorgeous samples.  I must say, I've really enjoyed working with these stamp sets and sharing them with you.  Thank you so much for your time!


Sunday, November 15, 2020

New Power Poppy -- Cuddle in the Cabin

Hello, again!  Here's another new Power Poppy stamp set I'm eager to play with, but did not manage the time for this week.  It's gorgeous!  Introducing Cuddle in the Cabin.


You know the drill -- head over to the Power Poppy Blog.  It will be worth the trip!  Have a beautiful day!


Saturday, November 14, 2020

New Power Poppy -- Season's Greenings

More fun and frivolity today with new stamps from Power Poppy's Quiet Christmas release!


Today we're sharing Season's Greenings.  This is a garden-themed set that's both cute and beautiful at the same time.  It's pretty much everything I love in a stamp set.  I mean, is this Santa not adorable?  Hoe hoe hoe!


My Santa has been out gardening in the snow.  It appears he's about to plant a Christmas tree which is already decorated with sparkly baubles.  I'm not sure you can see it in the photo, but his shovel and other garden tools are shimmered up with Wink of Stella.  He also has glitter on his hat trim.  I colored with Copics, and splattered with white acrylic paint.  In the graphic below you can see what I mean about cute and beautiful:


Don't forget to visit the Power Poppy Blog.  All the great stuff over there will really get you in the Christmas spirit!  Thanks so much for stopping to visit!


Friday, November 13, 2020

New Power Poppy: Enchanted Branches Woodland

Hi, there!  I do not have a card, but I wanted to be sure and show you the Power Poppy set that's being debuted today --  Enchanted Branches:  Woodland.


Read all about it on the Power Poppy Blog, and see awesome samples there.  I'm looking forward to sharing a card or two with this set later.  You know I love its warm and woodsy style.  Take care!


Thursday, November 12, 2020

New From Power Poppy -- Forest Fellas

Are you ready for five more new Power Poppy stamp sets?  Today we introduce Collection Two of the Quiet Christmas release, starting with Forest Fellas.


Love, love, love this set of woodsy critters all dressed up for winter!  Marcella has made them big enough for impact, yet small enough for us to enjoy designing a card around them.  They're available as digital downloads, too, but today I'm representing the physical stamp set so you can see the actual size on an A2 card. 


This is the most laid back bear I've ever seen... one paw in his pocket, the other wrapped around a warm mug of coffee/cocoa/tea/cider/toddy -- whatever suits your fancy.  Maybe it's tea laced with honey?  Because he's such an easy going fella I chose to use the "stay cool" sentiment with him.  It doesn't even have to be a Christmas card.  I'll use this set all winter and then some.  By the way, I love that he's wearing a watch, too.  It's just so much fun!


My cool guy is colored with Copics and hanging out on plaid and wood grain.  I added a little sparkle around him, but otherwise it's a simple image panel.   On future cards I'll use some of the accent stamps to create more of a scene.

If you haven't been there yet, be sure to visit the Power Poppy Blog to see Marcella's post and more uber-cute samples.  Lots more to come.  Stay cool!


Saturday, November 7, 2020

From Our Patch to Yours

Hello!  I'm glad you could stop by today because I have the honor of posting as a guest designer with the Penny Black Saturday Challenge.  Thank you Penny Black girls!


Penny Black Saturday Challenges are always anything goes... or an option.  The November option is this bingo/tic tac toe board.  I love a tic tac toe board!  Today I've used the center vertical option of ribbon or twine, Penny Black stamped image, and a sentiment.

My ribbon is ric rac, which I think qualifies, my Penny Black stamped image is Owlsome, and the sentiment comes with the set.

Here's a giggle for you:  I didn't notice that these owls were actually pumpkins when I ordered them.  I loved them at first sight and I don't know what I was thinking... whimsical owls with leaves for wings and flower bedecked feathers?  And what about the stems coming out the tops of their heads?  I was totally blinded by their cuteness.  Nevertheless, they're adorable for any kind of fall card.  


I'm pretending these are a Mr. and Mrs. with the Mrs. being the smaller one in the front.  I masked the Mrs., stamped the Mr. behind her, and gave them a grassy field from which to send their greeting.  The leaves are cut out and arranged as shown.  All coloring was done with Tombow markers, no water, on Fabriano Artistico Extra White 140 lb hot press watercolor paper.  A little strip of designer paper decorates the upper edge.  So much fun, and they do make a very happy greeting!

In addition to my guest spot at the Penny Black Saturday Challenge, I'm heading over to Darnell's NBUS Challenge #20 because this my first card with the Owlsome set.


As always, count your blessings and hang in there till things are back to normal because, seriously, this cannot be our new normal.  See you again soon!