Thursday, January 28, 2021

Daisy Vase

Thursday greetings, friends!  I know I'm not the only one who sometimes cuts a die and then ends up with a negative piece you simply cannot throw away.  Right?  So that's what happened here.  I cut a rectangular mat and the "thanks" word simultaneously from a piece of white cardstock and it created the beginnings of a card front.  Rather than slip it into the card parts drawer, I continued on.


I cut the word in white again so I could have those little parts to glue back into some of the letters.  Pulled a years old and well-loved Stampendous Daisy Vase from it's drawer and colored with Copic markers.  Before putting it all together on the kraft base I stenciled the frame with pale yellow polka dots.  I didn't totally love it until I added the die cut/Copic colored daisies in the corner.  They are snipped from a larger die.

The card appears to be a semi-slimline, and perhaps you could call it that.  Actually, I started with a pre-cut 5x7 card, but cut it down to 4 1/4 x 7 to fit the frame.  I'll mail it in the 5x7 kraft envelope that came with the card.  It works!


This is my first time use of the dot stencil, so I'll head over to the NBUS Challenge (never before used schtuff).


Thanks bunches for stopping by.  Wishing you a happy day!


Stamps:  Stampendous Daisy Vase  Paper:  Neenah Classic Crest Super Smooth Solar White, kraft  Ink:  Memento Tuxedo Black, SU Barely Banana  Coloring:  Copics  Other:  SSS Medium Dots Stencil, Cottage Cutz Thanks Phrase, Die-namites Daisy Bunch, rectangle die (forgot which one)


Monday, January 25, 2021

Feline Friends

Hello again!  It's been a while since I made this card.  I was thinking in terms of using some old papers with a not-yet-used stamp.  I seriously need to reduce the bulk in my basket full of stamps that have yet to see ink.  I love the quirky whimsy of Laurel Burch stamps and all the different things you can do with the color, so I combined this one with some nearly vintage BasicGrey.


I made a frame with an old tag die and I even used an eyelet.  Imagine that!  One down, 50 bazillion to go.  Coloring is Tombow water-based markers with minimal use of the blender pen.

I've always enjoyed mixing up papers and making fun, yet easy to mail cards.  This one with envelope and protective sheet weighs less than an ounce.  My very accurate little scale removes all the guesswork.  I bought the scale for weighing my Copics as I refill them, but it has come in handy for other things, as well.  The scale I purchased (in 2019) is here.

I'll send this card with its Laurel Burch stamp over to Darnell's NBUS Challenge (never before used schtuff).


Thanks for visiting!


Stamps:  Laurel Burch 'Feline Friends Like You' (Stampendous)  Paper:  Fabriano Artistico Extra White 140 lb hot press watercolor, dark gray card base, Neenah 110 lb white for layering under die cut frame  Ink:  Versamark  Coloring:  Tombow markers  Dies:  Sizzix Fancy Tags, Impression Obsession Heart Scroll Valance (scallop border), Spellbinders Scored and Pierced Rectangles  Other:  Black embossing Powder, black eyelet, Stickles Stardust glitter

Friday, January 22, 2021

Creating with Created to Create

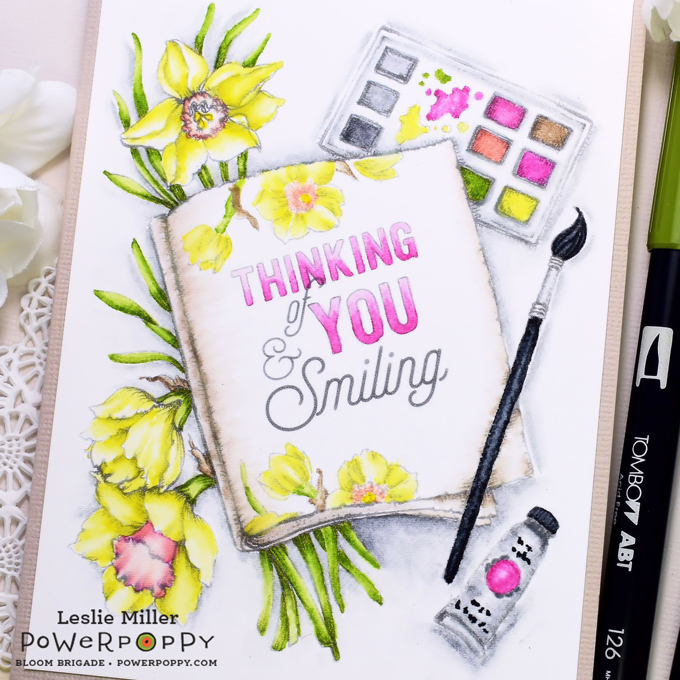
Hello, friends!  It really won't be long before the daffodils start popping up here on the Oregon Coast.  It's hard to believe, right?  We've had some beautiful days for working in the yard, but also some very wintry days.  That's our typical January. Today I have paper daffodils with Power Poppy's Created to Create digital stamp.

The set has black line drawings with and without text on the sketchbook page.  I chose the "without text" and did my own thing with a sentiment from the Hydrangea Hype digi.  I filled in with stamped daffodils (retired) in hopes of distracting the eye from the too-straight sentiment.


In Photoshop Elements 7.0  I added a diffuse glow filter to the image before printing.  The filter gave a softening effect and made the lines lighter in some areas while leaving them dark in other spots.  It's fun to play with filters on digis, but just remember to keep the original!


About the coloring:  I've been using the same set of Tombow markers since 2010.  In the past I've always scribbled on a palette and picked up with a wet brush for watercoloring.  Lately, however, I've been using just the markers without water.  Blend a very light shade into a darker shade... it's a lot like using Copics or pencils.  The marker tips can fray out with too much rubbing and scrubbing on rough paper, so I always use a light touch on good quality hot press watercolor paper.


Empty Copic marker filled with homemade "Tombow" blender fluid


For a softer look I like the blender pen.  The brush tip on the Tombow Blender frays out too quickly so I had the idea of using a blank Copic marker filled with homemade "Tombow" blender fluid.  Found the recipe online:

  • 2 tsp glycerin
  • 4 tsp distilled water
  • 1/4 tsp 70% rubbing alcohol

Shake in a small bottle to mix.  Use eye dropper to fill pen.

Each individual has their own preferences, but for me this coloring medium/method is a nice alternative to Copics -- way easier plus less costly and lower maintenance.  I still use all my other coloring tools, and love watercolor, especially.  Just saying ... 

I hope the new year is treating you well.  Take care, and have a happy day!


Wednesday, January 20, 2021

Twofer Flowers

Hey, there!  It was a dark and rainy day when I made these cards to play along in the Twofer Card Challenge #34 ~ Flowers.  Later that night our power went out for several hours.  It was quite stormy!  You can probably imagine I needed a little sunshine... so I gave it to myself!


The Twofer Challenge requires two different card designs for two different occasions using the same stamp, stencil, and/or die.  All is explained quite nicely on the challenge blog.  I have a "cheer up" card and a birthday card.  Same colors, but switched around.  The card designs/sketches are completely different.

My stamp in common is Rubbernecker Sketch Daisies which I bought before Christmas and had not yet used.  The sunshine card has a sentiment from a Sizzix stamp and die set.  I drew the vertical lines with a black marker, added the dots.  Black Diamond Stickles on the dots, flower centers, and butterfly body.


All coloring was done with Copic markers.   The birthday card has a designer paper card base and random dots courtesy of retired SU Itty Bitty Backgrounds set.


NBUS Challenge #22 -- My flower stamp is fresh out of the package.


Both cards are destined for the mail ASAP, and I hope they'll arrive with sunshine and smiles intact.  Have a happy day!


Stamps:  Rubbernecker Sketch Daisies, Sizzix Sending You Sunshine stamp & die set (first card), SU On Your Birthday and Itty Bitty Backgrounds (second card)  Paper:  Neenah Classic Crest Super Smooth Solar White 80 & 110 lb, black, Lawn Fawn Perfectly Plaid designer paper  Ink:  Memento Tuxedo Black, Tempting Turquoise, Prismacolor black marker, SU green marker  Coloring:  Copics  Dies:  Memory Box Stitched Circle Layers, Impression Obsession Medium Butterflies, unlabeled random Spellbinders rectangle die (first card), Lil' Inker Silly Stitched Die Set, Impression Obsession Butterfly Set (second card)  Other:  Black Diamond Stickles


Monday, January 18, 2021

Getting a Head Start with CAS Christmas Card Challenge

Hi there!  I have my first batch of Christmas cards for 2021.  You know how much I love every aspect of card making, but I tell you truly that when I finish each year's Christmas cards and get them in the mail I breathe a sigh of relief.

This month's cards were initially inspired by the CAS Christmas Card Challenge which asks for silhouettes.  My deer are part of the design in this older Spellbinders embossing folder.  I colored them solid black and featureless with a Prismacolor pencil, then smoothed over the coloring with a stump and odorless mineral spirits.  Pencils and mineral spirits do not bleed through to the reverse side, so I like them for a a single layer card.


I do think the first card is beautiful, but wanted to speed things up a bit.  One embossed panel made two cards as quickly one, assembly line style.  After making one of the first card I made three each of the cards pictured below.  So seven cards altogether this month.  I'm good with that.


The card in the first photo is playing in two challenges:

Let's Squash It Challenge #4 (use an embossing folder and an animal)

Sisterhood of Crafters (use die cuts and/or embossing)

The cards in the second photo are playing at CAS Christmas Card Challenge -- Silhouettes.


I do appreciate challenges for a little extra motivation.  Now back to our regularly scheduled program.  Have a beautiful day!


Stamps:  Poppystamps Joyous Christmas Wishes, Power Poppy Bottle Brush Holiday  Paper:  Neenah Super Smooth Solar White, antique gold specialty paper (old)  Ink:  Versamark  Coloring:  Prismacolor pencil & odorless mineral spirits for deer, Copics G29 & E17 for tree  Other:  Ranger Queen's Gold embossing powder, Spellbinders Reindeer Magic embossing folder, SU Subtle embossing folder, Spellbinders Labels Twenty & Standard Circles Small, Memory Box Bauble Snowflake and Pine Forest Frame, Hero Arts Wood Frame, Scotch brand foam mounting tape for sentiment circle

Friday, January 15, 2021

A Valentine for CAS Mix Up Reminder

Hello!  Back again with a reminder for the current CAS Mix Up Challenge.  Our host, Hilary, has asked us to use splatters on our cards and, since we're doing mixed media this month, we are also required to use at least one other mixed media element.  See the CAS Mix Up Challenge blog for all info.


I've been looking forward to using this stamp which was a gift from a friend, so with Valentine's Day approaching I went with a very sweet and pink love theme.


I stamped in Gina K Amalgam Warm Glow ink, which is a very faint, but still visible, tan or fawn color, then colored with Tombow markers and a blender pen.  My splatters are on the lower edge of the card as well as the die cut "love".

Mixed media elements:  Watercolor splatters + stamping + marker/blender pen coloring + die cuts

Check out more samples at the CAS Mix Up Blog.  So, there you go... now let's see yours!  Have fun!


Stamps:  Stamping Bella Bundle Girl with Falling Hearts  Paper:  Fabriano Artistico Extra White 140 lb hot press watercolor, Neenah card base (not visible)  Ink:  Gina K Amalgam Warm Glow  Coloring:  Tombow water-based markers and blender pen  Other:  Pink gem, Lil'Inker Silly Stitched Die Set, Frantic Stamper Sending Love/Hugs, Memory Box Precious Hearts


Pure Fragrance Semi-Slimline

Hello and welcome!

Heads up:  This is my 6 am PST post and I have another post at 10 am PST today.  I hope you'll enjoy both!

Marcella is featuring some beautiful flower digis on the Power Poppy blog today.  I've watercolored Pure Fragrance and designed a mini-slimline card -- 3 3/4" x 6 3/4".


The watercoloring was done with Tombow markers.  This utterly feminine image seemed a good time for stitching and lace.  Making note to self to dip into my lace stash more often.  This subtle and delicate addition adds no weight and slips easily into an envelope.  Love that!


Also being featured today is Volumes of Beauty -- another gorgeous digital stamp illustrated by Marcella.  I don't know which image my teamies have colored, but let's see samples here:

Thank you for visiting.  Have a happy day!


Stamps:  Power Poppy Pure Fragrance digi  Paper:  Fabriano Artistico Extra White 140 lb hot press watercolor, Neenah white card base  Ink:  Printer  Coloring:  Watercolor with Tombow markers  Other:  Lace, sequins, stitching

Tuesday, January 12, 2021

Five Years Old!

Hi there!  Today I'm celebrating with my friends at the Double D challenge blog as they celebrate their 5th birthday this month.  Congratulations, Double D!  They're asking that we use a cupcake on our creation.  I don't have much in the way of cupcake stamps or dies, but I do have this cute Bugaboo digi which I was happy to print up and color.


For the sprinkles on the cupcake I dotted first with various Tombow markers, then went over most of the dots with Souffle pens to make them puffy.  For the decorative pieces on the frosting I dotted with clear gel, then sprinkled with Art Institute glitter.  It's deep pink and very sparkly.  I think it was the wrong time of day for picture taking because the sparkles and texture don't show up much at all.

Double D 5th Anniversary/Birthday Cupcakes Challenge.  You can guess which part of the mood board inspired me:


Well, that was fun!  I'll be back on Friday with two posts.  Sorry, it just worked out that way this month.  Wishing you a cupcake kind of day!


Stamps:  Bugaboo Mouse-Cupcake digi, Power Poppy Best Day Ever sentiment  Paper:  Fabriano Artistico Extra White 140 lb hot press watercolor, SU Whisper White, Echo Park Happy Summer designer paper  Ink:  Printer, Memento Tuxedo Black  Coloring:  Tombow markers & blender pen  Dies:  Misc Spellbinders rectangles and circles  Other:  Viva Decor Glass Effect Gel, Art Institute glitter, Sakura Souffle pens, Scotch brand foam mounting tape


Friday, January 8, 2021

La Vie en Rose

Welcome back!  I'm happy to share my first Power Poppy card of 2021.  I'm using a rose which can be found in the La Vie en Rose digital set.  My sentiment, however, is from a retired Power Poppy clear stamp set (My English Rose).  A yellow rose means friendship, care, and remembrance.


I colored with Tombow markers and, in certain spots, a blender pen.  The card is minimally decorated with some pretty designer paper and a scrolly corner, as well as the scalloped edge.  Oh, and three little rhinestones.

Let's see other samples today:


Wishing you only good things as 2021 progresses.  Sent with love!

Stamps:  Power Poppy La Vie en Rose digital stamp and retired My English Rose clear stamp set sentiment  Paper:  Arches 140 lb hot press watercolor, Bazzill brown card base, 49 and Market Butter designer paper  Ink:  Printer, Palette Noir (sentiment)  Coloring:  Tombow markers and blender pen  Other:  Rhinestones, Die-namites Scrolly Corner, Lawn Fawn Outside In Stitched Scalloped Rectangle Stackables


Friday, January 1, 2021

CAS Mix Up Challenge -- A New Gig for Me!

Hello, friends, and happy new year!  A new year is a fresh start and it often brings resolutions, plans, new endeavors.  I've had a nice rest after Christmas and now I'm ready to jump back into things with my first post as a new team member of the CAS Mix Up Challenge.  I think this is going to be fun so let's get started!

It's a mixed media challenge this month.  Hilary is our host and she has chosen splatters as the main focus.  I like splatters!


Video Tutorials:
Splattering Techniques for Cards by Loll Thompson 4.25 mins
Perfect Splatters by Hedgehog Hollow 5.22 mins
Heat embossed water splatters by Jennifer McGuire at minute 11.

The listed video links may show you things about splattering that you've never considered, and they're fun to watch.  Here's my sample card:


This challenge is good CAS practice for me.  Lots of white space, uncluttered design.  My splatters have a lot of shimmer because they're made with Twinkling H2Os.  The die cut balloons were coated with Versamark ink and embossed with an iridescent embossing powder.  The sentiment is coated with gloss.  Mixed media doesn't have to be complex or artsy -- watercolor, die cuts, wet embossing, glossy accents -- most of us have these things in our toyboxes.

A closer look at the shimmer, sparkle, and gloss:


Be sure to check out the samples by the team and our lovely guest designer, Elaine, at the CAS Mix Up Splatters Challenge.  I hope I've covered everything.  Now, go forth and have a happy day!


Paper:  Cougar Natural, misc color scraps, Neenah 110 lb white for layering under die cuts  Ink:  Versamark  Splatters:  Twinkling H2Os  Other:  Very old Iridescent Peacock embossing powder, Ranger Inkssentials Glossy Accents, Impression Obsession Balloons, Tutti Celebrate Word Set