Friday, June 30, 2017

Party Like a Puppy

Hi there!  One more cute card for this week as it's all I've got done for now.  Not a whole lot of stamping going on here lately.  This one was made way back for a June birthday.  I used a Bugaboo digi from their Birthday Puppy set.  Three images in the set and all cutie patooties.


I colored this puppy black like my birthday friend's little black Cocker Spaniel, not that this pup is a Cocker Spaniel, but, hey, it's close enough.  Good thing I have dog loving friends seeing as how I have a hard time resisting cute dog stamps.  It's colored with Copics on Neenah Classic White.  Glitter was added along with a few extra black speckles.


Speaking of party puppies, Tuesday was Wally's birthday.  Eight years young.  Here's our handsome guy:


And, not to be forgotten, I'll include our pretty LuLu:


I love them both so much it hurts, but I've probably mentioned that a time or two.

It's another busy day for me.  Does one ever catch up?  Summertime adds even more activities to the agenda, sheesh.  I'll list supplies below my signature.  Have a happy day!


Stamps:  Bugaboo Birthday Puppy digi stamp set, SU sentiment  Paper:  Neenah Classic Crest Solar White for image, Neenah 110 lb white for embossed panel, pink, green, old BasicGrey designer paper  Ink:  Printer, Memento Tuxedo Black, Copics for coloring  Accessories:  Stickles Stardust glitter glue, Cuttlebug Scrollwork embossing folder, Memory Box Cross Stitched Frame Borders, Memory Box Banner Parade (including heart)

Wednesday, June 28, 2017

Bear'ing Gifts

Ho ho hello!  If I was going to get my monthly Christmas card done it had to be less involved than some of the cards I've been making lately, so I just watercolored and stitched onto a mat which was then adhered to a designer paper-covered card front.  This 2010 Whipper Snapper Bear'ing Gifts was next on my list.  Love him.  So cute and friendly... and generous!


Honestly, when I purged and redesigned my stamp room I had in mind to spend more time coloring in front of the big window and less time on the other side of the room designing the card, which takes as much time as coloring, yet old habits are hard to break.  And, let's face it, it can be a lot of fun.  Just depends upon my mood.  My options are open as I kept plenty of supplies for both coloring and designing.  But, I digress... rambling again.


I added glitter and some white gel pen accents and an old PSX sentiment which seemed right for my jolly fellow.  Tombow markers were used for watercoloring on Arches 140 lb hot press watercolor paper.

Hope he makes you smile.  Have a happy day!


Stamps:  Whipper Snapper Bear'ing Gifts, old PSX sentiment  Paper:  Arches 140 lb hot press watercolor, SU Riding Hood Red, white card base, Whimsy Stamps Winter Blues designer paper  Ink:  Palette Noir for outline, Versafine Onyx Black for sentiment, Tombow markers for watercoloring  Accessories:  Stickles Stardust and Goldenrod glitter glue, Signo uniball white gel pen

Monday, June 26, 2017

Wrapped Frame and a Fancy Fold

Hi, all!  As mentioned in an earlier post I'm going to show my method for wrapping a frame, but first, let me qualify the fancy fold.  It required no particular craftiness on my part as the card base was sent to me by my Double D teamie friend, Darlene -- pre-scored and with instructions for folding.  It's called a reverse explosion.  I had admired her card here and the next thing you know... I received happy mail!  Darlene purchased the card bases pre-cut and pre-scored so, sorry, no instructions or measurements available.  It's a tricky fold and even with instructions I had to go look at Darlene's card again to really "get" it.  I'm usually pretty run of the mill with my card folds, but there will be more fancy folds coming shortly.  I get by with a little help from my friends.

There are a lot of photos here so I'll try to keep the talk to a minimum.  First, the card with the wrapped frame front and center:


I mixed up some Power Poppy stamps, some DCWV Lemon Flower paper, and a few die cuts.  Supplies will be listed at the end.  All folds were covered with designer paper.


The card folds into a 5" square.


Now... the frame.  Whatever size or shape you choose, cut designer paper slightly larger.  Large enough to fold over the edge of the frame.


Adhere frame to back side of designer paper.  Cut X as shown.  Trim corners as shown.  The points of the inside flaps will be trimmed off.


The photo below shows the points trimmed off and double-sided tape applied.


The finished frame looks like this on the back side:


Decorate as desired.


I made this into a very cheerful anniversary card -- one of four I'm making for a friend.  Plenty of glitter and happiness!

I hope this all made sense.  More details in the recipe further down.  Thanks for visiting!  Enjoy your day!


Stamps:  Power Poppy Dynamic Duos: Glads and Gerberas, Dynamic Duos: Peonies and Tulips (sentiment)  Paper:  Pre-scored reverse explosion card base, Neenah 110 lb white for daisies and sentiment flag, other white for daisy die cuts, DCWV Lemon Flower designer paper  Ink:  Memento Tuxedo Black for daisies, Versafine Onyx Black for sentiment, Copics for coloring  Accessories:  Silver cord, Stickles Stardust glitter glue  Dies:  Spellbinders Classic Squares Large and Small, Spellbinders Nested Lacy Pennants, Memory Box Banner Parade, Sue Wilson Daisy Cluster

Wednesday, June 21, 2017

Double D Challenge -- Weddings

Time for another Double D challenge already?  Why, yes it is, and this time Team Darlene is asking for Wedding-themed cards.  Seems June is all about Weddings and Father's Day when it comes to card making.  I don't have any weddings in the offing, but you never know...  I'll be ready with the card I'm sharing today.


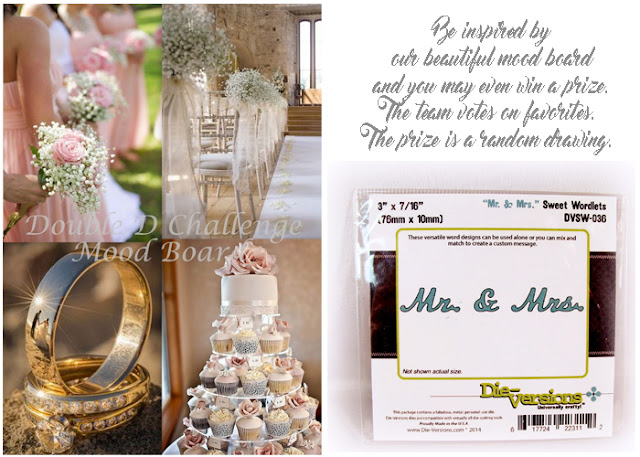
Have a look at our pretty, pretty mood board:


I was completely enchanted by the pink roses and baby's breath the bridesmaids are holding, but there's a lot to be inspired by in the mood board.

I made paper roses with pearl centers.  Didn't have any baby's breath so I used white die cuts instead.  Now, you know I don't ordinarily use chunky flowers on my cards, but a wedding card is special.  I thought if I made them more like wild roses they'd be a little less chunky and, in fact, I made an over-sized envelope from heavy weight paper and the card fits very nicely inside.  The roses are already crinkly, so you can hardly mess them up.


I used an old Spellbinders Blossom Nestabilities die set -- three sizes for each rose.  These are circle dies with a lightly scalloped edge.  Cut from heavy paper -- not as heavy as card stock -- then doused thoroughly with water and wadded up tightly.  Put the layers together after they dried.  Two of the flowers were dried with a heat tool, but one was left wet and wadded overnight (ran out of time).  The overnight flower came out the best, I think.

The lower half of the card was embossed with a large Anna Griffin embossing folder, then swiped over with a white craft pad (pigment ink... the kind you can emboss).  Brings out the pattern beautifully.  Top half was cut in a curve and stamped with a retired SU Fine Lace background.  "Love" is a Power Poppy stamp.

Finished up the inside similarly.  The sentiment is from a Power Poppy digital set -- not a wedding sentiment, necessarily, but I think it works.  It would also be a cute sentiment for a baby card, don't you think?  Just stretching the resources.


I'll sum up the ingredients in the recipe further down, but first I want to remind you to visit Double D for more challenge info and to have a look at how the team was inspired.  You'll see quite a variety of pretty things there!  I'll be back when stamping happens.  Have a beautiful day!


Stamps:  Power Poppy My English Rose clear stamp set (love), Power Poppy Tulips digi set (inside senti)  Paper:  Neenah Classic white, pink paper for roses, SU Pink Pirouette smooth and textured  Ink:  SU Pink Pirouette, Going Gray, Craft White (all SU inks), printer for inside digi sentiment, RV00 Copic to color inside leaf and highlight sentiment  Accessories:  Pearls, silk ribbon, silver cord, Cuttlebug Anna Griffin Wildflower Gate embossing folder  Dies:  Spellbinders Blossom Nestabilities and A2 Curved Borders One, Memory Box Chloe Stem, Poppystamps Sylvan Sprig, Dee's Distinctively Sm Pair of Leaves (inside)

Thursday, June 15, 2017

A Special Father's Day Card

Ever since we've had Wally and LuLu I've been making dog cards for Rich for Father's Day.  They're from Wally and LuLu, of course, because they can't make their own cards.  Rich, being The World's Best Dog Dad, deserves a special card, so this year I thought I'd try something a little different.

Using an idea from Debbie Olson's blog here I converted a photo to a digital stamp and then watercolored with Tombow markers.  Seriously, I should have paid more attention to Debbie's coloring tips as I think the Copics would have worked out better, but at the time I was only thinking about converting the photo.  I know... excuses, excuses!  I realize this card is only special to The World's Best Dog Dad, but here you go anyway:


Easiest thing in the world to do.  I opened the picture in Photoshop Elements 7, applied a "stamp" filter to it, lightened a little, then printed.  By the way, Debbie shared a link to a free software program that does essentially the same thing.

It's somewhat painful to look at the actual photo and my painting in such close proximity.  I couldn't seem to get the gold color right.  All efforts made them either too yellow or too red, so I settled on the red.  Hey, if you didn't know them...


I stamped the "bark woof" over top in Memento Tuxedo Black.  The stamps are from an Inkadinkado "Dogs" set.  It means "we love you" in dog language.

Finished it up with designer paper scraps and Core'dinations card stock (sanded) which I need to quit hoarding.  Brought some brads out of hiding, too.  I think he'll be surprised.  Maybe Wally and LuLu will get him some new tennis balls to go with it.

Have a happy weekend!


Monday, June 12, 2017

The Sweetest Peas

Sweet Peas.  Don't they smell wonderful?  They fill a room with scent and beauty.  I love them, but haven't grown them in years.  I do have some Copic colored sweet peas to share today, though.  This is Power Poppy's Sweet Pea Show digital stamp.  You can also get sweet peas in a clear stamp set at Power Poppy -- Sweet Memories.  I've had these printed up and tucked away in a box and finally brought them out to play last week.


Before printing I lightened the image and applied a softening filter.  The full image was printed up on a 4x6 sheet, but I cut it down to a square.  I mixed and matched some Power Poppy stamp sets -- Go Wild for the sentiments and Soothing Sympathy for the butterfly.

The butterfly was stamped in black directly onto the paper, then stamped again, colored, and cut out.  I sure didn't want to have to cut out those skinny legs and antennae so I cut them right off and glued the body and wings over top.


All those gray dots around the flowers are touched with a Spica clear glitter pen.  Couldn't catch the sparkle without making everything else look awful, but you can imagine.

I used many, many Copics for coloring.  They're fun, but, dang, you need a lot of them for an image like this.

  • Greens:  YG03, YG67 for leaves.  G20, G0000 for soft background shading.
  • Purples:  V0000, V01, V12, V15, V17
  • Pinks:  RV10, RV13, RV14
  • Reds:  R30, R32, R35
  • Dots:  C3
  • Butterfly:  C3, C7, E97, E08, B26

A real expert could probably get by with less.

I added the butterfly so I could play along in this month's Power & Spark Challenge at Power Poppy -- June Bug.  Cute name!  You have all of June to play along and the random prize is a $50 shopping spree.  Seriously worth the effort!


I'm also playing along in The Flower Challenge Anything Goes.  Gorgeous stuff there!


Okay, I've yakked long enough.  After a week of rain we have a week of sunshine ahead of us, so stamping will be on the back burner for a while.  I'll pop into my room now and then, but it will probably take a while to finish/photograph/blog anything.  I may surprise myself, though.  We shall see.  Have a stamp happy day!


Stamps:  Power Poppy Sweet Pea Show digital stamp set, Go Wild and Soothing Sympathy clear stamp sets  Paper:  X-Press It Blending Card, other white for card base, SU Cameo Coral, Graphic 45 Precious Memories designer paper, scrap SU designer paper  Ink:  Printer, Cameo Coral, Memento Tuxedo Black, Copic markers as listed above  Accessories:  Ribbon, ribbon slide, Copic Atyou Spica clear glitter pen, corner rounder punch, Die-namics Wonky Stitched Squares

Friday, June 9, 2017

Giggles for Friday

Giggle!  Happy Friday!  I made this card for a guy friend.  He's only thirty something so birthdays are not yet something to gag about, but it will make him laugh.  He loves to laugh.


I stamped the SU! Giggle Greetings on 140 lb hot press watercolor paper with Palette Noir ink and watercolored with Tombow markers.  Smooshed the sky and added the die cut banner and fence.


Some cards are just so quick and fun.  Glad I have friends who love to laugh.  I love to laugh, too.  It's good exercise!  Hope you all have a happy weekend!


Stamps:  SU Giggle Greetings  Paper:  Arches 140 lb hot press watercolor, SU Cool Caribbean, textured white, DCWV Nana's Nursery Baby Boy designer paper  Ink:  Palette Noir, Tombow markers for watercoloring  Accessories:  Die-namics Wood Grain Fence, Memory Box Banner Parade

Wednesday, June 7, 2017

Blue and White for Baby Boy

It seems ages since I made this card.  A month, maybe?  I was celebrating the arrival of a baby boy in May, so I looked ahead to Double D Team Diane's Blue & White Challenge which starts today.  So, you see, it's a color challenge.  Your choice of theme, stamps, dies, design, shade or tone... just make it blue and white.


Necessity and supplies at hand brought me to the baby card I created, but just look at the beautiful inspiration board below, sigh...


As of this writing I'm making a plan for another card based on an image in that board.  Hope it pans out.  The team has the very difficult task of voting on favorites, but you know there's always a prize for a random winner, as well.  Check it out:


My card has a lot going on with all the die cuts and pearls, stamps, stitching, embossing, glitter...  It was hand delivered so I could make it lumpy.  I wanted to use real ribbon but, believe it or not, I didn't have anything that looked quite right.  All that ribbon... drawers and drawers of it... and nothing worked.  I will not use that as an excuse to buy more ribbon!


The hearts were punched and the onsie and socks are stamped and cut out.  To make things easier I'll list the dies here:

  • Cheery Lynn French Pastry Doily
  • Memory Box Stitched Circle Layers
  • Spellbinders Standard Circles Small
  • Tattered Lace Washing Line Just for You
  • Die-namites Beautiful Bow

Other ingredients are listed in the recipe below my signature.

Be sure to stop by the Double D blog to see all the blue and white samples.  The teams did a beautiful job interpreting the inspiration board.  You'll want to see the winners of our previous challenge, too, which are listed in a separate post.  Also, a heads up:  You can get a peek at our next two challenges in the sidebar at Double D, just in case you like to think ahead.

That's all folks!  Have a happy day!


Stamps:  Darcie's Play Time  Paper:  Neenah 110 lb white, SU Soft Sky, Lawn Fawn Perfectly Plaid designer paper  Ink:  Copic BG53 to color "Just for you", SU Taken with Teal  Accessories:  Pearls, SU heart punch, Stickles Stardust glitter glue, We R Memory Keepers Quilted embossing folder, dies as listed above

Monday, June 5, 2017

Rose Basket

This is one of those accidental cards.  Honestly, I probably never would have put this together if I hadn't been trying to do something else entirely.  It started with a whole other image and the large square frame from my scrap drawer.  The frame had been cut in white.  I colored it with a Copic marker to coordinate with that other image, but it turned out a completely wrong choice.  Then auto-crafting took over.


I ended up focusing on the frame rather than putting it back in the scrap drawer.  The Graphic 45 Botanical Tea paper pad is a beautiful collection, but there's one piece I don't particularly care for, so I thought if I used it to cover the frame there wouldn't be much showing and it would look okay.  Alas, I still didn't care for it, but I kept on and on...

I searched through my stamp drawers for an image that would look good with the paper and came up with this ages old rose basket.  Colored with Copics, sponged, layered, stitched, embellished with die cuts...


Now what shall I do with this card?  I mail or give away everything.  My June birthdays are done.  It's not quite right for my July birthdays (two of which are guys).  I decided to make it into an anniversary card for a friend who asks for four anniversary cards every year.  This is just her type of card as she loves the hand crafted look.  So... all that time spent and at least it's not for naught.

The frame, by the way, is wrapped in the paper.  You've seen that done before, I'm sure.  It's been a while since I used this method to cover a frame and I'd forgotten how much I like it.  Hopefully I'll do it again soon and then I'll try to demonstrate for those who might be wondering.  My auto-crafting this time did not include stopping for pictures.

Thanks for letting me share my story.  Does anything here sound familiar to you?  You probably have those times, too, where you start out with one idea and end up with another.  I guess that's part of the fun.  Have a happy day!


Stamps:  All Night Media Anna Griffin (no other name on stamp)  Paper:  SU Naturals Ivory, old Hero Arts specialty gold paper, Neenah 110 lb white (layered under the gold for die cuts), Graphic 45 Botanical Tea designer paper  Ink:  Memento Rich Cocoa, Ranger Distress Tea Dye (for sponging), Copics for coloring  Accessories:  Spellbinders Grand Squares, Spellbinders Bird Scrolls

Friday, June 2, 2017

Gold Embossed Tulips

Tuesday I shared the kitchen dress cards I made for a friend, and today's card will be included in a batch I'm giving to another friend.  She likes the hand crafted look, so I'm hoping this isn't too simple for her.  I used the single tulip from Penny Black's Delicate Florals set, embossed in gold and watercolored with Tombow markers.


I didn't invest a lot of time in the watercoloring.  I just marked along the embossed lines and spread the ink around with a wet brush.  Easiest watercoloring ever.  In fact, I made two of these.  When in doubt go easy on the ink and heavy on the water.  Clean the brush frequently so as not to spread too much color.  The effect is nice, considering.

Gold embossing can look dull as dishwater unless it's turned in the light a certain way, so here's another angle:


After coloring I cut the 4x4 panel into 1" strips and glued to the card with just the tiniest degree of separation.  The score line at the lower edge helped with even placement of the strips.

The card base is Neenah 110 lb white.  The watercolor paper is Arches 140 lb hot press.  The sentiment is an unmarked 1997 oldie.  I gold embossed the tulip inside for additional decoration.

Easy to make, easy to explain!  Now here I am wondering how I could have possibly waited so long to finally use this pretty tulip stamp.  Crazy!  Have a happy day!