Friday, March 31, 2017

Experimenting with New-to-Me Mixed Media Paper

Hi, there!  Yes, I've been under a rock and I've never tried mixed media paper before, but I was enabled to do so by Pam at Expressions with Heart.  She's been using it for sponging beautiful backgrounds, which is what I hoped to do as well, but somehow I veered off in another direction.  Sponging is yet to come...

First of all, I should tell you the paper is Strathmore Mixed Media Vellum Surface.  Prices vary.  I got it on Amazon for about half the price shown on the link I provided, as I chose one of the other sellers.  I didn't know what to expect with the "vellum surface".  It's not vellum as we know it, but very smooth and it handles ink beautifully.

On my first card I mixed two media on my mixed media paper.  Three, if you count the glitter.


The media I mixed are Copic coloring for the image, and ink smooshing for the background.  I'm happy to report the paper works as well with Copics as it does with water-based inks.  You know how you can use the Colorless Blender for removing inks outside the lines?  Well, with this paper you can cleanly remove every hint of color.  I've never had another paper on which the Colorless Blender worked so well.

After the Copic coloring was done I painted water around the areas I wanted to smoosh, then scribbled a Tombow marker on an acrylic block and used it like a stamp on the paper.  The Memento ink I used for the image outline will smear when wet, so I had to be careful to avoid it.  Another option is to smoosh first, then do the stamping and coloring.


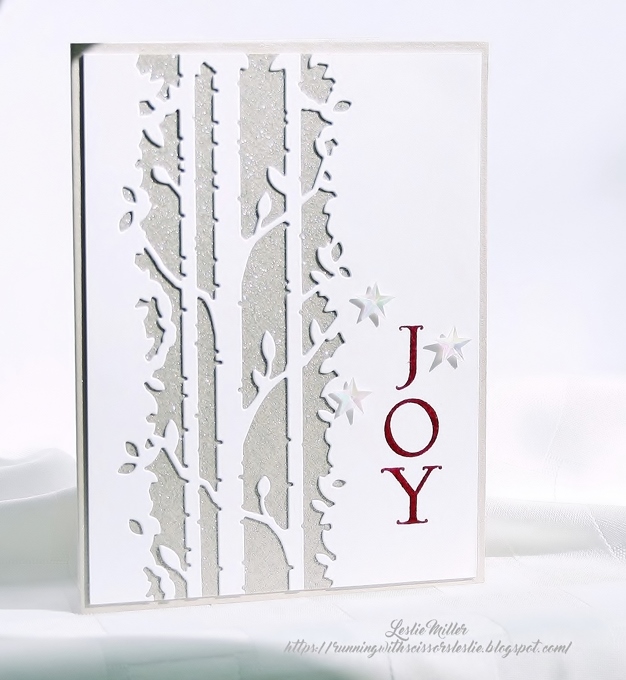
To finish the card I stamped the retired JustRite sentiment in Versafine Onyx Black and touched the snow first with clear Stickles glitter, then sprinkled micro-fine glitter over that.  The image is Penny Black's Pretty Perch.

That was so much fun, I had to try another, this time watercolored with Tombow markers.


Another Penny Black image, Poppy Gems , with a very old Uptown Design sentiment from my collection

Ink moves like crazy on this paper.  It's probably not the best for watercoloring because you can lift the ink right off with water.  However, I like how it enabled the marker ink to move around, rather than soak in and get stuck in one spot.  Layer the inks one color at a time, dab with water, but not too much water.  I like the loose, splotchy effect.  More smooshing in the background.  I have a lot more experimenting yet to do.


I will have more stamping next week, but first there are some things around the house and garden that need my attention.  The forecast calls for a couple of dry days coming up.  This rain has been relentless!  I hope you're enjoying a better spring where you are.  Have a happy day!


Monday, March 27, 2017

Vintage Easter

Welcome back!  I have a few more cards to share this week and I do hope you'll enjoy them.  Today it's an Easter card.  I don't buy many holiday-specific stamps, except Christmas, so I find myself hard pressed to come up with anything new.  However, I do have this Power Poppy digi stamp called Vintage Easter Egg, and because of its name I was inspired to turn it into a vintage card.

I recently printed several Power Poppy digis all in the same manner, with the color lightened and then a softening filter applied.  In this case I lightened and softened the image, but added the sentiment "full strength".


It was colored with Copic markers to coordinate with the Prima Romantique designer paper.  Notice the lady on the far right -- she appears to be wearing a fancy Easter bonnet.  I layered two patterns for the Sue Wilson Porto die, and the colored image was cut with an older Spellbinders Large Scalloped Oval die.

After coloring I did the cracked glass technique:  Thoroughly smooshed the image with Versamark ink, then embossed with ultra-thick embossing enamel.  Repeated once for extra coverage.  Put it in the freezer for a few minutes.  It curled, as it always does with this technique, and when I flattened it out it cracked.  I rubbed saffron ink into the cracks for a more aged look, then wiped off the excess with a soft cloth.


I counted up all my not-yet-used stamps the other day.  Have you ever done that?  I keep them separate so it's easy to see what needs attention.  Turns out, if I whittled away at the rate of three a week it would take six months to use each of them once, but realistically it will take longer.  I'm really trying to get a handle on this.  Your thoughts?

I'm going to link up to The Sisterhood of Crafters Lace Challenge today.  Thanks, Sisterhood!

I'll keep on stamping and check back with you later this week.  I'm so glad you stopped by.  Have a happy day!


Stamps:  Power Poppy Vintage Easter Egg digi  Paper:  X-Press It Blending Card, Very Vanilla, Bazzill blush, Prima Romantique designer paper  Ink:  Printer, Versamark, Saffron, Copics for coloring  Accessories:  Lace, ribbon, button, linen thread, ultra-thick embossing enamel, Sue Wilson Portuguese Collection - Porto die, Spellbinders Big Scalloped Ovals Large, Scotch brand foam mounting tape

Friday, March 24, 2017

Two for Christmas in March

Hello!  I hope you'll bear with me as I wrap up the week with the monthly Christmas cards.  I have to honor my commitment to myself, and if I don't share them it would be too easy to cheat, wouldn't it?

I kept it simple this month, using only dies and stamped sentiments.  First up is a sponged sky in the background.  It could be a bright moonlit night or a winter sun.  I just didn't feel like going dark with it, so perhaps it's not very realistic, but then, neither is a glittery gold tree in the stitched landscape.


The sponging was done with teal ink on X-Press It Blending Card, but the dies are cut with Neenah 110 lb white -- my favorite for dies.  The tree is three layers.  The top was smooshed into my Versamark pad and embossed with gold embossing tinsel.  I can't even begin to capture the flash and sparkle in a photo, but I tried.  Just imagine it 1000% more sparkly:


Dies used on the first card are:

  • Simon Says Stamp Birch Column
  • Poppystamps Stitched Landscapes
  • Impression Obsession Fir Trees


The second card is simpler still.  Just the Birch Column with a Power Poppy Botanical Tree "Joy" sentiment.  I layered the Birch Column over silver glitter paper and used shimmery silver card stock for the base.  The sentiment is embossed with a claret-color powder, and star sequins added.


Back to spring stamping after this.  There's been more going on with the stamp room re-do.  Rich put up a molding strip and I had to take some things apart for spray painting, so it's somewhat in disarray at the moment.  I allowed myself  a few crafty days before making another mess in there, but currently it's not easy to stamp when all my inks and embossing powders, etc. are in another room...  I do have a couple of cards I'm still limping through, trying to finish.  See you next week, I hope!


Wednesday, March 22, 2017

My First Altenew

Good morning (or afternoon or evening)!  I hope all is well and good in your world today.  I have yet more stamping to share today.  Share 'em if you've got 'em, right?  I recently purchased my first Altenew stamps.  Golden Garden for the flowers, and Wishing You for the sentiment.  We danced around each other for a while and then I thought it was time to sit down and play.

There are a lot of different stamps in the Golden Garden set and it took some figuring on scrap paper to decide how best to put them together.  Ultimately I used just three of its stamps and made a very simple card.


I like the brush stroke look of this set and really just wanted something super easy to color.  A few strokes and dabs with limited Copics was all it required to look passable.  You could do more or less.  It's hard for me to leave well enough alone.

This is one leaf stamp and one seed cluster, each stamped twice with no masking.  The flower was cut out and glued on.  I drew intersecting lines with a black Copic Spica glitter pen and accented behind the image panel with a black Memory Box Riviera Corner.

More playing is in order with these stamps as there are about 15,000 different things you can do with them.  That number, by the way, is unverified, but you can do a lot.

I'm off and running again.  Have a good day!


Stamps:  Altenew Golden Garden (flowers) and Wishing You (sentiment  Paper:  Neenah Classic White for image panel, Neenah 110 lb white for card base, SU Marigold Morning, black  Ink:  Memento Tuxedo Black, Copics for coloring  Accessories:  Queen & Co sequins, Copic Spica Pitch Black glitter pen, Memory Box Riviera Corner

Monday, March 20, 2017

Graceful Still Life

Well, hello again, and welcome to Monday!  I'm happy to be moving right along with more never-been-used stuff.  Today it's this oh-so-beautiful Graceful Still Life digi stamp from Power Poppy.  Is that not the sweetest, most feminine image?


I also used a corner die that I picked up at Dies R Us for at least 70% off.  I'm not certain, but I think they're closing out these Die-namites dies as the prices are still hugely slashed.  You can almost always find something you like for 70% off.  It makes a simple, unimposing frame for the colored image.

Pictured below are the Copics I used.  I tried to limit the color palette, just switching around many of the same colors in different areas.


To create a soft, romantic look to the print I lightened somewhat and then put a softening filter on it.


This digi set includes the dogwood branch all by itself, so I went ahead and colored that one, too.  The occasional sunny day we've had has really gotten me in the mood for fresh, light spring colors.


Have a beautiful day!


Card #1:  Stamps:  Power Poppy Graceful Still Life digi  Paper:  X-Press It Blending Card, So Saffron, white card base, Prima Julie Nutting designer paper  Ink:  Printer, Copics for coloring as pictured above  Accessories:  Pearl, Die-namites Scrolly Corner

Card #2:  Stamps:  Power Poppy Graceful Still Life digi (dogwood branch), My English Rose clear stamp set (sentiment)  Paper:  X-Press It Blending Card, Bazzill Springtime green  Ink:  Printer, SU Garden Green, Copics for coloring  Accessories:  Die-namites Scrolly Corner

Friday, March 17, 2017

A Happy Hello

Happy St. Patrick's Day!  Gee, maybe I should have made something green for today, but there's a little bit of green on my card, and more peeking from the inside.  See it there?

Today I've used something brand new as well as something not new, but never been used.  The stamp set is Flower Silhouettes (new), and the twirly clouds have been waiting their turn for quite a while.  I even had a little sun for the picture.  Oh, happy day!


I wondered why I was drawn to this particular stamp set out of all the new stamp sets I see every day.  It wasn't until I sat down to work with it that I realized it's a Bugaboo stamp.  There's just something about Bugaboo...

This set is very easy and quick for cute cards, which probably accounts for why I used it without delay.  In fact, I made two cards lickety split.  No complex coloring or techniques.  Just plain fun.  The little bit of coloring was done with Copic markers, and I used Nuvo drops in the flower centers.

I hope you all have a happy weekend!


Stamps:  Flower Silhouettes  Paper:  X-Press It Blending Card, Neenah Classic White, SU! Real Red  Ink:  Memento Tuxedo Black, Real Red, Copics for coloring  Accessories:  Apple Green Nuvo Crystal Drops, Fiskars scallop scissors, Poppystamps Twirly Clouds

Wednesday, March 15, 2017

Things that Fly -- A Double D Challenge

Hello, and welcome to another Double D challenge!  We're doing "Things that Fly" this time around, and the inspiration board has lots of options.  The nice thing about creating for a specific challenge is that it gets you to looking around your stamp room, and that's how I happened to use all old stamps on my card today.


The Stampendous butterflies are my first ever clear stamp set, dated 2004.  I would have guessed they were older.  2004 doesn't sound like so long ago, but 13 years...  I guess it's relative, 'cause, you know, the 70s don't seem like so long ago to me, either.

The butterflies are embossed in black -- once on the card and again cut out with the wings lifted.

I also used an old script background, old sentiment, some leaves I've had quite a while.  I even used some of my oldest Spellbinders dies.  All details are in the recipe further down.  The velvet ribbon was pulled from a drawer full of velvet ribbon that I hardly use anymore.  All good stuff!

I took inspiration from the black and white butterflies and the flower color in the board below:


The team will vote on favorites, but additionally a random winner will receive this prize:


I remembered to photograph the inside of the card, too:


Come on over to our "Things that Fly" challenge and see more team samples.  They're pretty amazing!  Have a good day!


Stamps:  Stampendous Butterflies, Hero Arts So Sorry (leaves), JustRite Sympathy sentiments, SU! retired En Francais background  Paper:  X-Press It Blending Card, SU! retired Cameo Coral  Ink:  SU! retired Ruby Red and Cameo Coral, Versamark, Versafine Onyx Black, Ranger Archival Shadow Grey  Accessories:  Velvet ribbon, black embossing powder, white embossing powder, Spellbinders Curved Rectangles Nestabilities (sentiment tab) and Parisian Accents (border)

Monday, March 13, 2017

Warm and Cozy

My stamp room is finally usable again!  Can you feel my happy?  It still needs some finishing touches, so I'll wait to share pictures, but it looks so fresh and pretty and I want to be in there all the time.  I cannot, of course, sigh...

Power Poppy is currently previewing their spring stamp release -- eight new swoonworthy sets and you know I love them all!  For the time being, however, I'm trying to catch up on coloring some of Marcy's digis I've collected.  While I'm in the mood for spring, today's card speaks more to the dark, rainy days we've been having and it makes me feel like curling up by the fire.


Using the Get Wool Soon digi, I made it for an ailing friend who dabbles in knitting and likes a purple and blue color combo.  It's printed on 140 lb hot press watercolor paper and watercolored with Stampin' Up! inks.  I lightened the image before printing, but it was still easy enough to see the detail.  It gave the yarn a nice, soft look.

You may tee hee at what I've got going on there with my knitting project.  I honestly don't know anything about knitting.  Maybe my friend had a good giggle when she received this card, but you know they say laughter is the best medicine.

After painting I unleashed a splatter storm on it in an effort to disguise some inky streaks my printer left behind.  Darn printer, but I love that it lets me watercolor.

I'll be back Wednesday.  Keep stamping, my friends!


Stamps:  Power Poppy Get Wool Soon digi  Paper:  Arches 140 lb hot press watercolor, Brocade Blue, Bazzill dark brown  Ink:  Printer, various Stampin' Up! inks for watercoloring  Accessories:  Scotch brand foam mounting tape to pop up image panel

Sunday, March 5, 2017

Painting the Stamp Room

Hi, friends!  Since there's not much in the way of stamping going on here I thought I'd share a little peek at what's been keeping me busy.  I was in an energy lull after Christmas, which went on far too long, so I thought it was time to start painting my stamp room.  Seems like it's taking forever, but considering we only work on it a couple hours a day, what can I expect?  There are a lot of other things that need doing, as well.

Two walls and the ceiling are done, so I put half the room back together.  Check out the color.  I thought I had selected a pale aqua, but it appears more mint green to me.  Minty fresh.  I like it more all the time, but I still keep trying to see aqua in it.  The mint green is rather retro looking, but when you get down to it, aqua is a rather retro color, too.  Think old cars and every kitchen my mom ever had when I was growing up.  Okay, you wouldn't know about the kitchens, but trust me...  Mom said it was a cool color and she needed that in the kitchen.


The other half of the room still looks like this (below).  You can see the old color.  Hey, it looked good at one time.


Meanwhile, this is going on across the hall where LuLu has laid claim to a pile of warm laundry.  I know... dog hair, sheesh!  Just give it a good shake.  Love me, love my dog hair.


I finally hung up the seashell wreath I bought last summer.  It has nothing to do with stamping, but I like it and it looks good with the color.  Crafted by a local artist from local beach findings.  I have another one in my blue bathroom.


Mint green... or aqua...?  I'm so confused!  There is a fine line between the two colors.

Two walls to go and some finishing touches, but it already looks so much more bright and cheery.  I'm heading off to paint, now.  See you soon, I hope!  Have a good day!


Thursday, March 2, 2017

Birds at Feeder

Hello, and welcome back to springtime!  Okay, it's not spring quite yet, but we can dream, can't we?  Most days here the rain has been pouring, and we even had some freezing rain and snow last Friday.  I'm feeling a little housebound...

Today's card is using a stamp from my week-after-Christmas online shopping trip.  It's an Inkadinkado stamp called "Bird Feeder".  Probably an older stamp as I found it a few pages back on this website.  I made three different cards with it, this being the one I like best, stamped in a light gray ink and then watercolored, soft with not too much contrast.


I used Stampin' Up! inks for watercoloring, and an old Hero Arts sentiment.  Dipped into my massive brads collection to secure the sentiment die cut, but otherwise no embellishment.

Stamping has been set aside for the time being as I've begun painting my stamp room, and it's as big a bother as I expected it to be.  More about that later.  I'll pop back in again soon.  Wishing you well!


Stamps:  Inkadinkado Bird Feeder, Hero Arts sentiment  Paper:  140 lb Arches hot press watercolor, Bazzill green, Pink Paislee Butterfly Garden designer paper  Ink:  Ranger Archival Shadow Grey, Versafine Onyx Black  Accessories:  Brads, Memory Box Oval Master Frame, Spellbinders Grommet Tags