Wednesday, December 21, 2016

Silver and Gold for Double D Challenge

Hello, again!  Welcome to Double D's final challenge for 2016!  We'll surely be right back in 2017, 'cause this has been just too much fun, but for now, let's wrap up the year with Silver and Gold.

This challenge doesn't necessarily call for a Christmas card, but that's what I made, seeing as how I was hurrying and scurrying to get them in the mail.  I've got silver embossed snowflakes and gold die cut snowflakes and "noel".  Another super easy card.


Our inspiration board is so pretty and can give you lots of ideas:


Come visit us at Double D to see awesome team samples and the winners of our previous challenge.  There's a prize you'll want to check out, as well.  Hope you can play along!  See you again soon!


Stamps:  SU! Serene Snowflakes  Paper:  Neenah 110 lb white  Ink:  Versamark  Accessories:  Silver embossing powder, Spellbinders Create-A-Flake Five, SU! Wonderful Wreaths Framelits die

Tuesday, December 20, 2016

Christmas Stars

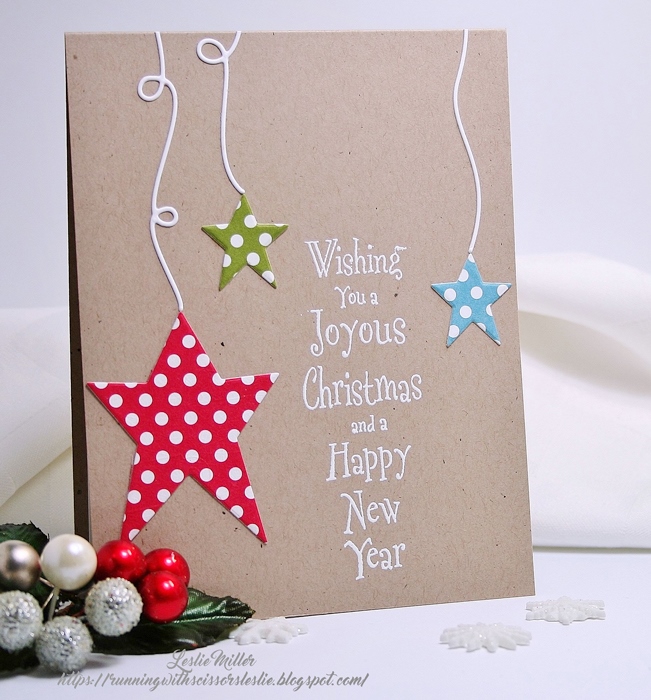
Moving right along...  Today's two cards are some of the simplest I made this year and, yet, some of my favorites.  I would have made more, but you know how I am about multiples.

I used Sizzix Primitive Stars dies and a balloon string die to hang them.  The sentiment is old, from Hero Arts.  The card base is that Neenah 110 lb cover card stock I love so much.  These stars have Stickles Stardust glitter on all the white dots.


The second version has more colors, on kraft with a white-embossed sentiment.  No glitter on this one.  I don't know which one I like better.


Very simple and quick!  Happy holidays!


Monday, December 19, 2016

Stenciled Poinsettias

Happy countdown-till-Christmas week!  I hope things are coming together for you.  This week I'll share the last of the Christmas cards.  For the most part I had to set the coloring aside as I'd given myself barely a month to make almost 50 cards.  What was I thinking?

I was hurrying along when I made this card.  Yes, more pink, but just grabbing the closest ink pad, I guess.  We'll imagine these flowers are poinsettias, somewhat stylized, perhaps, but you can see the resemblance.


After I die cut the Stitched Poinsettia Trio from my last card I was left with a negative that looked like it would make a good stencil, so I tried it out.  Sponged pink through the stencil and then defined the petal edges with a mulberry Prismacolor pencil, blended with Gamsol (odorless mineral spirits).  Took a quick shot of my paraphernalia below:


All those cute little snowflakes are from Power Poppy's Action Santa set.  They were stamped in SU!'s Cool Caribbean.  I cut away part of the lower edge and added a die cut sentiment, backed with a scrap of designer paper.  Finished off with silver sequins and silver cord.


I had CAS(E) This Sketch #202 in mind when I made this.  The design team had lots of variations, so I'm hoping I'm close enough to the design .  Here's the sketch:


Also joining the fun at CAS Mix Up -- Stamping + Sponging + Your Choice.  I have stamped snowflakes, sponged flowers, and my extra choice is the pencil coloring on the flower edges.


I'll be back tomorrow.  Supplies are listed below.  Have a happy day!


Stamps:  Power Poppy Action Santa (snowflakes)  Paper:  Neenah 110 lb white, BasicGrey Eskimo Kisses designer paper  Ink:  SU! Pink Pirouette and Cool Caribbean  Coloring:  Mulberry Prismacolor pencil and Gamsol  Accessories:  Silver cord, silver sequins, Impression Obsession Holiday Bottom Word Edgers

Thursday, December 15, 2016

Totally Feminine and Totally Masculine Christmas Cards

I'm all done making Christmas cards for this year, and it's funny how my spirits lifted almost immediately.  I do enjoy making them, but the all-consuming last-minute hurrying gets to me.  It's not as if there's nothing else to do during the season.  I had to take most of a day to create our 2017 Golden Retriever calendar and our yearly photo book (Shutterfly), plus I had to select nine 5x7's for a wall unit that's been waiting forever for me to get that done.  Now, most of the (minimal) shopping is done, as well, and I think I can actually start enjoying myself.  Happy dance!

The first card I'm sharing today isn't even going anywhere this year.  It's a jump start on my 2017 Christmas cards, and I sure hope I can keep it up.  It's all pink and feminine with flowers and a bird and soft colors.


Flower centers have Pale Gold Nuvo Crystal drops in them.  I did my best to keep the drops fairly flat.  The flowers look all fluffy and dimensional now, but they'll probably be flat as a pancake by the time it reaches its destination since I'll mail this in an envelope.  They may retain some shape, and they'll still be pretty.  Card size is 5 1/4 x 4 1/4.

The "Joy" and the dark gray area of the bird are covered with Wink of Stella, all softly shimmery.  I colored the snowflake die cut with a B0000 Copic.  Color was added to the poinsettias with ink and a sponge dauber.  Dies are as follows:

  • Poppystamps Stitched Poinsettia Trio
  • Poppystamps Snowflake Breeze
  • Elizabeth Craft Birds
  • Die-namics Stitched Rectangle Frames
  • Stampin' Up! Wonderful Wreath Framelits


The next card is all guy, made for our son.  Lots of wood grain and very simple.


All on a kraft card base, I used Tutti Designs Scrolly Deer Edge and a Die-namics Stitched Rectangle Frame.  Black embossed a retired Stampin' Up! sentiment.


My first card with the bird is playing along in City Crafter's "Christmas Things that Float or Fly" challenge.


I think that wraps it up.  Have a good day!


Monday, December 12, 2016

Two with Poinsettias

Happy Monday!  Has the weekend gotten you a little more caught up yet?  I'm picking away at my to do list.  Most of my cards are in the mail now, but still a couple more to make.  Next year I'm starting sooner, honestly.

These two cards were made in a quicker jiffy than they may appear.  I cut a frame with a tag die for the card on the right, then used what popped out of the center for the card on the left.  The poinsettias with foliage were done with one die which cuts everything at once -- both right and left.  I die cut two bows.  Die cut a designer paper panel for one card, and entirely covered the other card front.  Supplies are listed below.


After all the cutting was done I colored the poinsettias with a red Copic.  This die cuts enough flowers to double layer each one, but I only layered the largest flower.  For balance I put the extra flowers in the lower corner.  Dotted the flower centers with gold Stickles after assembly.


Dies:

  • Poppystamps Stitched Main Street Tags
  • Memory Box Seraphine Laurel -- I'd like to thank my bloggie friend, Connie, for inspiring me to rush right out and buy this die set.  Her summer birthday card with the flowers in pink is a must see, but she also mentioned doing them in red for Christmas.  Brilliant!
  • Impression Obsession Large Bow -- My favorite bow die.  It has curly tails, but I most always cut them off.
  • Taylored Expressions Stitched Rectangle Stacklets


Old timey sentiments from my collection.  Designer paper is American Crafts Kringle and Co. from last year, I think.

I'll be back shortly.  I haven't been photographing every card because sometimes it just gets to be too much.  Who has the time?  Merry, merry!


Friday, December 9, 2016

Action Santa

I feel like I'm racing along like Santa, but it's all starting to come together.  The house is decorated and I've got only a few more cards to make.  They're getting simpler and simpler as I go along.  Even this one is pretty simple, really.  Stamped and colored on a spare-part embossed panel that was laying on my table.  I thought the swirls resembled snow flurries, or maybe Santa's big hurry has created an avalanche.  Uh oh!


Santa is Power Poppy's Action Santa set.  So cute and fun and festive for Christmas!  I love this one, but, you know, I've got a kid in me who just won't be restrained.

The embossing is a large Darice Corner Scroll Background on Neenah 110 lb card stock.  I shaded the swirls with blue to help bring them into the scene.  Ordinarily I use X-Press It Blending Card for Copic coloring, but I like the way the markers blend on Neenah.  I have to be more careful about feathering outside the lines, though.  There are a couple of "oops" on this.  That's the thing about X-Press It -- you don't get the feathering/bleeding.  Doesn't make it "oops" proof, but it helps.

Moving right along... I've got more simple cards to share next week, but I hope to do some coloring, as well.  See you soon!


Wednesday, December 7, 2016

Christmas Joy

Hello, friends!  Are you busy with this busiest of all seasons?  As I visit blogs and talk with friends I'm learning how some are cleaning and decorating, some baking, some shopping, and some are still working on their Christmas cards like me.  Or how about all of the above?  I got out my musical Christmas mug and a snowman bubble light for the hallway, and that's as far as I've gotten with the Christmas decorations.  However, as I write this Rich is putting up the outside lights, yay!  It's beginning to look a lot like Christmas.

The other day I made six very simple cards, which helped with the progress.  I thought I'd make more of the one I'm sharing today, but by the time I made two I was already wanting to move on to another design.  I just can't seem to stick to assembly line multiples.


The Poppystamps Scribble Snowflake Circle was cut in white glitter paper then layered onto another in pale aqua so it would stand out against the white card base.  I feel like I'm having double vision when I look at it.  The "Joy" is an SU! Wonderful Wreaths Framelits die.  Polka dot paper was glued to a layer of white before I cut it.  That was glued onto another layer of 110 lb white.  It needed some substance so it would lay nicely over the double-layer snowflake circle.


Finished up with some Doodlebug enamel dots for extra color.  The card base is Neenah 110 lb which I absolutely love for these simple cards with few or no layers.  It's very sturdy.  I'll generally line the inside of a card to balance the weight, but it's not necessary with this heavy cardstock.

Happy holidays!


Monday, December 5, 2016

Chickadee in Barberry

We have so many birds in the garden right now it appears as though the whole landscape is in motion.  I love watching them, and it's nice to get up on a December morning and hear the birdsong.  I've grown very fond of my feathered friends, so naturally I had to be sure and color up one of them for Christmas.


This is Chickadee in Barberry, a digital stamp from Power Poppy.  We have barberries and lots of chickadees, but no snow at our house.  Just rain and soggy wet everything.  However, when the sun comes out it sparkles so prettily on the wet foliage.  I glittered the snow in the image and used a white gel pen to add a few falling flakes.  Gee, if I'd cut the border a little lower I could have added some twine or gold cord, but at least it's very flat for easy mailing, and I do need as many of those as possible.

I printed on X-Press It Blending Card and colored with the following Copics:


The shading around the image is a smooshy pointillist kind of thing, fading to lighter colors and wider spaced dots at the outer edges.  Just having fun.  Pictured below are the markers I used in the background:


The lower edge was cut with Spellbinders Bracket Borders One, and wood grain designer paper covers a white card base.


Thanks for dropping in today.  I hope to see you again soon!