Showing posts with label thank you. Show all posts

Friday, May 12, 2023

Anemones From a Friend

Have I mentioned recently what a lucky girl I am?  Today's cards are thanks to my friend, Michele, who is very generous with her Pinkfresh washi tape.  I received a most lovely package from her and set to work play with very little delay.

Today it's all about the Anemones.  I used every single piece on two cards, including the insides and one envelope.  The Spellbinders Infinity Punch & Pierce Plate and Essential Stylish Ovals are some of my new favorite things, so I put them to play, too.  The first card is on an Aspen green base, chosen to match the green leaves.


The photo below shows more of the golden shine.  So pretty!


I switched colors for the next card, using a pretty lilac for the card base and dark blue for the sentiment.  The flowers are popped up on both cards.  There is more information in the recipe.


That's all for now.  I'm sharing the bounty with another friend and looking forward to playing again.  Thanks, Michele, and thank all of you for stopping in to visit!


Stamps:  Sentiments from Pinkfresh (1st card) and Power Poppy (2nd card)  Paper:  Pinkfresh Anemone washi tape on white, Neenah Classic Crest Super Smooth Solar White, CTMH Aspen Green, SU Pale Plum  Ink:  SU Handsome Hunter (sentiment 1st card), SU Not Quite Navy (sentiment 2nd card)  Dies:  Spellbinders Infinity Punch & Pierce Plate, Essential Stylish Ovals, and Scored and Pierced Rectangles, miscellaneous small rectangle for sentiment on 1st card  Other:  Gold self-adhesive half pearls, SU Subtle embossing folder, Scotch brand foam mounting tape

Thursday, April 27, 2023

Birds and Blooms

Hello friends!  I'm sharing four cards today that made me very happy as I was working on them.  I was the 100th entry in the first Triple B (birds, butterflies, and blooms) challenge and was surprised with the most beautiful 6x6 designer paper pad for my efforts.  Thank you, Diane and Darlene!  There is not one sheet of paper in that pad that I'm not totally in love with.

The gorgeous paper is Dress My Craft Hydrangea Lawns.  Have a look:


I've been saying over and over again how I need to get to work with some of my designer papers.  Still, I dragged my feet.  I don't know why something suddenly clicked when I saw a card set on Pinterest.  I'll link you to the post here.  I guess the timing was right.  When you look at the inspiration I'm sure you can see the resemblance, but I diverged quite a lot in order to accommodate the pattern of my papers.  I chose a few different bird dies from my collection, some of which have been around for a few years.  I'm in the process of collecting new bird dies.  All in good time.

The first in the line up features a Cottage Cutz die called Bird Trio.  It's a simple die, all one piece.  I layered 2 or 3 times (?) plus cut again and trimmed out the bird bodies, then colored and glued back in place.  The years old Hero Arts sentiment was white embossed on SU Brilliant Blue cardstock.  Not sure if they even still make that color.  It coordinates nicely with the blues in the designer paper.


Next up is one of the oldest bird dies in the group -- Die-namites Birds on a Wire.  I think they're out of business.  I brushed the birds with purple and blue, then spritzed with water.  The leafy branch was borrowed from another die set which is coming up in a moment.  Another Hero Arts sentiment on this card.


The third card, below, seems rather sparse because the scripted background is so light, but I like it.  More purple and blue on this one.  The bird and foliage are Memory Box Finnegan Fronds from 2015.  The stitched ring is nested Memory Box Stitched Circle Layers from the same year.


The last card features Memory Box Serene Bird and Branch.  I adore this sweet bird.  This photo has an unfortunate glare because the paper has a bit of gloss to it.  It's all the more beautiful for it in real life.  Quite a substantial weight, too.


I'm a designer paper-loving girl all the way.  I know how much fun it is to make your own backgrounds, but I'm not good at resisting a beautiful set of papers, and since I have them I really should be using them.  Raise your hand if you love designer papers, too.

Sending happy wishes your way!


Thursday, June 30, 2022

Yogi's Flowers

Hi all!  Some coloring happened in my stamp room.  It took three sit downs, but mission accomplished.  Pain and numbness creep up on me when I stick with it too long.  There's plenty I can do, not complaining, but adjustments must be made.  Enough about that.

The flowers on my card were hand drawn by my long-time blog friend Yogi.  She knew how much I admired it and then kindly surprised me with a digital copy for my coloring pleasure.  Thank you, Yogi!


I lightened the image for no-line coloring, then printed on watercolor paper.  However, this is not totally a watercolor.  The background shading is watercolor, but Copics were used on the flowers.  The sentiment is an old woodblock stamp.  Border was drawn with a gray marker.

Every time we send a hand crafted card we send a portion of ourselves.  I hope snail mail never goes away.  Have a wonderful day!


Stamps:  Digital flowers hand drawn by a friend, Great Impressions sentiment (old woodblock stamp)  Paper:  Fabriano Artistico Extra White 140 lb hot pressed watercolor, dark gray Bazzill cardstock base  Ink:  Printer, Ranger Archival Watering Can  Coloring:  Copics for flowers and SU ink for watercolor background, SU gray marker for border


Thursday, February 3, 2022

A Card and an Update

Dear friends, first I would like to offer my thanks and gratitude for your support and kind words during this time that's been all upside down and backwards.  I hope I haven't missed emails or been unresponsive and, if so, please accept my most sincere apologies.

About Tuesday's MRI:  Happy dance!  It was the final word after an ultrasound and a CT scan left me unsure of my future.  As it turns out, all of my insides are perfectly normal.  Whew!  That was a crazy ride.  Let's not even talk about that anymore.  It's nice to have something to celebrate, isn't it?

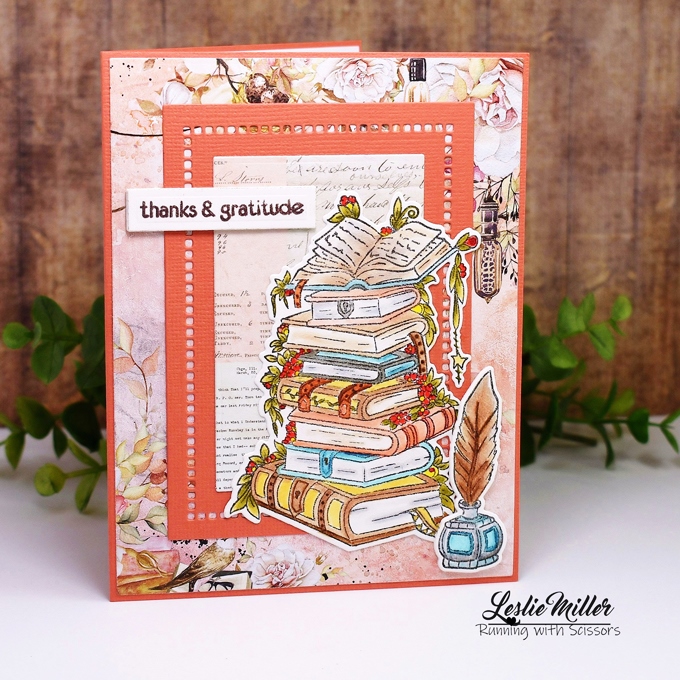
I have a card to share today which I made... gee... a month ago maybe?  The stamp set was a Christmas gift and the card was sent to the giver as a thank you.


The set is Altenew's Books Are Magic.  Colored with Tombow markers and cut with the matching dies.  My friend knows me well -- I love books, love to color, and love when I have matching dies with a set.  I played with Mintay papers and chose all colors to coordinate with the papers.  The sentiment is actually from another Altenew set.  I'll list everything below.

I'll be trying to catch up with visiting in the coming days.  I'm so ready to get back to my happy place.  Have a wonderful day!


Stamps:  Altenew Books are Magic (with matching dies) and Wishing You (sentiment)  Paper:  Fabriano Artistico Extra White 140 lb hot pressed watercolor, coral textured cardstock, Mintay Dear Diary designer paper  Ink:  Palette Noir, SU Chocolate Chip for sentiment  Coloring:  Tombow markers  Other:  Spellbinders Hemstitch Rectangles, miscellaneous small rectangle die, Scotch brand foam mounting tape to pop up sentiment

Monday, May 24, 2021

Blossoms in Bloom

Happy Monday, friends!  I hope this finds you well and ready for a brand new week.  We continue to carry on here with the work around the house, checking things off the list.  I'm ready for the day everything returns to normal routine.  Before I temporarily lose my stamp room I'm getting a few cards done and some posts written up.  I would not want to lose touch with you all!

Today I have a couple of cards made with the SU Blossoms in Bloom set which I received as a very nice gift from a dear friend.  I'm playing around, getting a feel for the stamps and I can see there are a lot of different ways to use them.  The first card is a  4 3/4" square, all filled up with flowers, and just for fun I added a bird from a Spellbinders die set.  It was already made up and set aside so I might as well use it, right?


The next card is fun and simple with only the smaller flowers scattered around.  The letters were cut from a stamped piece left over from the first card.  The scalloped card base is from a full and fabulous package of goodies sent by another friend.  I'm a lucky girl to have such friends.


Colors and other card details are listed below.  We do have fun, don't we?

Seeing as how this is a first time use of Blossoms in Bloom I'm going to share over at Darnell's NBUS Challenge #26.


Thanks for dropping by and I'll see you again soon!


Stamps:  Stampin Up Blossoms in Bloom  Paper:  SU Whisper White, Ballet Blue, other yellow  Ink:  SU Cameo Coral, Ruby Red, So Saffron, Ballet Blue, More Mustard, Chocolate Chip, Certainly Celery, Old Olive  Other:  Corner Punch, unknown scallop die for card base, Spellbinders bird from Sweet Birdie Thanks Scene, Memory Box Stitched Circle Layers, Memory Box Wooden Alpha

Friday, February 12, 2021

A Cup of Buttercups

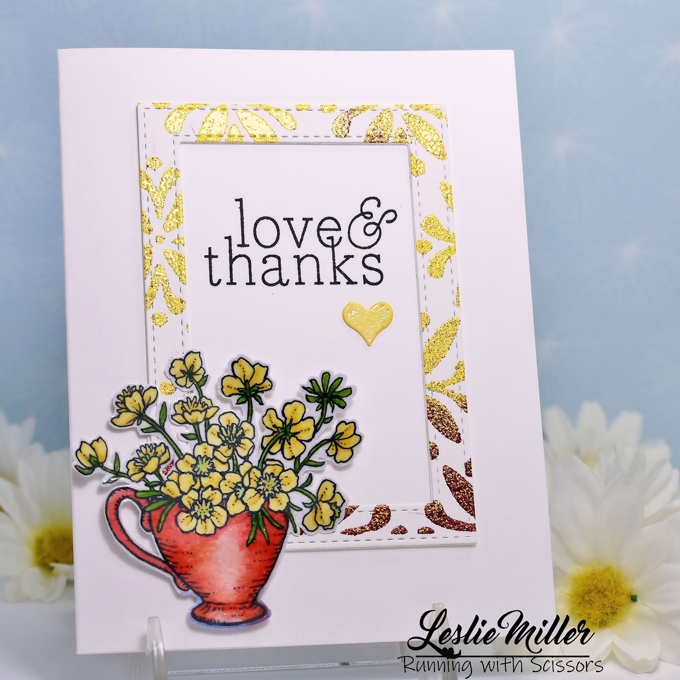
Hello!  I made it back with flowers for Friday.  Still have the trigger finger flare up going on, but this card has been finished for weeks and waiting its turn on the blog.  I've used Power Poppy's Cuppa Buttercups digital stamp and a sentiment from Power Poppy's Nice Things to Say clear stamp set.


The frame was cut from a stenciled and heat-embossed background, same as this card.  I found the buttercups already colored in my card parts drawer, so I simply cut them out.  Before I popped them up on the card I coated the cup of flowers with Versamark ink and embossed with clear powder.  It's not noticeable in the photo, but adds a nice effect in real life.  The little heart was also embossed, first with sparkly powder, then with clear.

Check out cards by my Power Poppy peeps, as well:

I hope I'll be able to do more of what I love soon -- coloring.  I'm able to do little bits at a time, with a very light touch.  My stamps aren't going anywhere, so I can just bide my time.  I do have some works in progress.  Can you say addicted?  Take care and I'll see you soon!


Stamps:  Power Poppy Cuppa Buttercups digi and Nice Things to Say clear stamp set  Paper:  Neenah Classic Crest Super Smooth Solar White 80 & 110 lb  Ink:  Printer, Memento Tuxedo Black, Versamark  Coloring:  Copics  Dies:  MFT Die-namics Stitched Rectangle Frames, Paper Smooches Hearts  Other:  Stamplorations Winter Flowers stencil, embossing powders - yellow, dark red, clear, sparkly, Scotch brand foam mounting tape

Monday, February 1, 2021

CAS Mix Up Challenge: Stencil Heat Embossing

Hello, friends!  It's time for our February CAS Mix Up challenge.  This month it's hosted by Nancy and she's asking us for Stencil Heat Embossing.


Please see the challenge blog for all the instructional videos Nancy has linked.  For my stencil heat embossing I smooshed Versamark ink through the stencil and then applied two different embossing powders -- yellow and dark red.  I allowed the dark red to filter through the yellow so it has a peppery look.


While I had all my embossing supplies out I decided to also emboss the sentiment and an accent leaf.  On those you can see the pure colors.  Gave it a white wood grain frame and hopefully enough white space to still call it CAS.

Come along and play with us at CAS Mix Up.  Have some fun with heat embossing through a stencil and exercise your CAS skills at the same time.  I'm still working on mine.  There are great samples by the team and our guest designer, Arlene, on the challenge blog.  Enjoy!


Paper:  Neenah 80 & 110 lb white  Ink:  Versamark  Stencil:  Stamplorations Winter Flowers  Dies:  Cottage Cutz Thanks Phrase, Hero Arts Wood Frame, Paper Smooches Foliage 1  Other:  Yellow and dark red embossing powders, dark red string


Thursday, January 28, 2021

Daisy Vase

Thursday greetings, friends!  I know I'm not the only one who sometimes cuts a die and then ends up with a negative piece you simply cannot throw away.  Right?  So that's what happened here.  I cut a rectangular mat and the "thanks" word simultaneously from a piece of white cardstock and it created the beginnings of a card front.  Rather than slip it into the card parts drawer, I continued on.


I cut the word in white again so I could have those little parts to glue back into some of the letters.  Pulled a years old and well-loved Stampendous Daisy Vase from it's drawer and colored with Copic markers.  Before putting it all together on the kraft base I stenciled the frame with pale yellow polka dots.  I didn't totally love it until I added the die cut/Copic colored daisies in the corner.  They are snipped from a larger die.

The card appears to be a semi-slimline, and perhaps you could call it that.  Actually, I started with a pre-cut 5x7 card, but cut it down to 4 1/4 x 7 to fit the frame.  I'll mail it in the 5x7 kraft envelope that came with the card.  It works!


This is my first time use of the dot stencil, so I'll head over to the NBUS Challenge (never before used schtuff).


Thanks bunches for stopping by.  Wishing you a happy day!


Stamps:  Stampendous Daisy Vase  Paper:  Neenah Classic Crest Super Smooth Solar White, kraft  Ink:  Memento Tuxedo Black, SU Barely Banana  Coloring:  Copics  Other:  SSS Medium Dots Stencil, Cottage Cutz Thanks Phrase, Die-namites Daisy Bunch, rectangle die (forgot which one)


Monday, September 21, 2020

Three Little Birds in Navy and Turquoise

Hello, and happy Monday Fun Day!  This is when the cute and/or quirky stamps come out (as if I need a reason).  That seems to be the "buy me" trigger these days.  I saw these birds on Bonnie's blog right here, loved them, looked them up and bought them before I even left a comment on her post.

I white embossed (same as Bonnie did), but then watercolored with SU inks.  It's been forever since I used those inks for watercoloring.  In the past they were my go-to medium, but then so many other things came along.  I really enjoyed this and will use them again soon.


The "thanks" is a resin disk that's been in my stash for a long time.  Rummaging around in my self-adhesives, I unearthed this and two others that I hope to use soon.  I'll list all supplies at the end.


  • I probably would have given these birds a lot more color, but today they're representing me at Color Hues Challenge #2 -- Navy and Turquoise.  Neutrals are welcome.  I think they look great in these colors!
  • It's my Three Little Birds first time out of the package, so I'll be heading over to Darnell's NBUS Challenge #18, too.


Thanks for your time!  I just received a new package of stamps in the mail (ahem), so I'll be admiring them and shuffling them around on my table for a while and, hopefully, using them soon.  They're fall stamps and will definitely be getting colored this year.

Enjoy your day!


Stamps:  Impression Obsession Three Little Birds, Hero Arts You're a Great Friend, SU Itty Bitty Backgrounds (splatters)  Paper:  Fabriano Artistico Extra White 140 lb watercolor, Neenah Classic Crest Super Smooth Solar White, SU Cool Caribbean  Ink:  Versamark, SU Chocolate Chip, Tempting Turquoise, Night of Navy, Creamy Caramel  Other:  White embossing powder, resin sentiment disk, Paper Smooches Foliage 1


Friday, August 28, 2020

Power Poppy: Healing Bouquet

Hello again!  I have another beautiful new digi from Power Poppy today.  This one is called Healing Bouquet.  Marcella's art makes my jaw drop.  Girl knows how to draw botanicals!  Have a look:


I used a hand stamped sentiment, but there are also digi sentiments with Healing Bouquet.  My coloring was done with Copics on 140 lb hot press watercolor paper.  I chose Copics for this one because I printed on the wrong side of the paper.  Fabriano Artistico extra white has 2 subtly different sides and I seem to get better results on one side.  Maybe it's just me.  I do love this paper when I'm careful to use the correct side.

I encourage you to check out the rest of the team's cards here:


It's been a treat for me to color and share these new Power Poppy digis and I hope you enjoyed looking.  Thank you so much for your time.  Take care!


Wednesday, March 25, 2020

Bedelia

A mid-week hello to you!  I feel like I finally accomplished something in my stamp room.   My focus has been scattered and I've been unable to settle.  Gee, I wonder why?  I think we're pretty much "business as usual" at my house, but with certain restrictions, yet everything feels different.  Yesterday we went to one supermarket to pick up a few perishables, but then had to go to an additional store to finish up our list.  Even then there were things missing.  Are people eating more eggs than usual?  Bread?  I really can't complain, though.  We've been pretty lucky here.

Today I'm sharing something sweet.  Bedelia the Bunny is a Stamping Bella a friend gifted to me.  She's one of my favorites because she's an adorable critter and you know how I feel about critters.


I colored her with Copics and added Wink of Stella to the blooms and Stickles glitter to the flower centers.  I even embellished with sequins, which I need to do more often, considering I have a bunch of them.  Have they gone out of style yet?  I hope not!  I strung a little garden banner in the corner.  Trying to keep this CAS without sacrificing too much.


This was a rather quick card which was good for my current short attention span (due to distraction, ahem), but on the other side of the room I also had a watercolor going on.  I'm thinking that might be the new normal in my stamp room for a while.  Anyway, I finished the watercolor and I'll share it on Friday.  Meanwhile... I think I'll start two more projects.

Take care, wash your hands, keep your distance, stay safe and let's make this bug go away!  Hugs and love to all.


Wednesday, February 26, 2020

Sweetest Thank You

Hello, friends!  I was beginning to wonder when I was going to get around to playing in my room again, but I did finally manage a little something.  It's simple and sweet and I love it to pieces, which reinforces my belief that simple is best when my mojo's gone missing.  If I don't have time to slow down, I won't do a good job with coloring anything complex.  In fact, I did color something, but I'm not thrilled with how it turned out, so I'll be going back to the drawing board on that one.  In the meantime, today's card makes me happy!


I've been at The Scrapping Cottage again, shopping for bargains in the retired and overstock categories.  Most of my Cottage Cutz dies are for Christmas, but this one kept calling me back until I finally dropped it into my cart.  I thought it made a cute thank you card.  The die set is Kitchen Chef.  Simple coloring was done with Copics.


More new things:  The green trim is Poppystamps Double Scallop Oval and Border, and the gingham card base is Park Lane printed card stock which I found at our local JoAnn's.  I was pretty thrilled with the card stock -- a pack of 5 different designs, 10 each, 110 lb weight.  I've already cut and folded every sheet.  That's a lot of cards!

I hope you all are having a good week.  As for me, I'm enjoying myself and will just have to let card making happen when it happens.  Thanks for dropping in today!


Monday, November 18, 2019

Rubbernecker Again

Ready for another week?  I've been coloring when I can and still living the rest of my life, as well.  Sometimes I wonder how I fit it in, but we all need to find time for the things we most enjoy, right?

Today I'm back with another Rubbernecker stamp.  This one is Stacked Tea Cups and I love it to pieces.  I think it might be an older stamp, as they have a lot of old stamps mixed in with brand new stamps.  Truth is, the site can be puzzling to navigate.  Just saying', but it's worth it.  The sentiment is Rubbernecker, too -- Day in Paradise.


Little critter details revealed themselves to me as I went along with the coloring.  Some are more apparent than others:  4 butterflies, 1 beetle, 2 snails, 3 bees, 2 caterpillars.  My favorite critter is at the very top.  Adorable.  What a fun stamp!


Kept the design simple, but with a few things going on:  Scored across the top and tied with baker's twine, punched the sentiment in a circle, popped up the image panel.  Just taking a little break from the seasonal cards.  There will be plenty of that coming up the rest of the year.  Odd to think 2019 is almost over, isn't it?

Okay, I'm off to see what kind of trouble I can get into the rest of this day.  I hope your day is a good one!


Thursday, October 10, 2019

Twofer Card Challenge #21: Sweets

It's time for another Twofer Card Challenge and Sweets is the theme!  That opens up all kinds of possibilities from lollipops to petit fours.


Remember, it's cards only,  two different designs, two different occasions, and must use a stamp, stencil, or die.  No digital stamps for the prompt image, please.  See the Twofer Blog where Darnell has been very thorough in explaining the concept on her Rules, Definitions, and FAQ pages.


The stamp I used for the Sweets theme is an older, well-used Stampendous Tiers of Treats.  I've made a birthday card and a thank you card.


Here's the whole stamp for the birthday card, combined with stitched dies and glittery sprinkles.  I stamped a Poppystamps sentiment below.


For the thank you card I taped off everything below the strawberries tier before I inked up the stamp.  Then pulled off the inky tape and stamped on my paper.  Voila!  Strawberries only!


Hop over to the Twofer Blog for samples by the team and our talented guest designers.  You'll get some great ideas!  Enjoy your day!


Dies, birthday card:  Lawn Fawn Outside In Stitched Scalloped Rectangle Stackables, Taylored Expressions Stitched Rectangle Stacklets, Memory Box Banner Parade
Dies, thank you card:  Taylored Expressions Ric Rac Borders, MFT Die-namics Wild Greenery

Thursday, September 12, 2019

Thanks

Hello there!  I've been crafting my fool head off.  I don't know about you, but when I get on a roll I just have to go with it.  All these new things sitting on my desk are making me want to get a move on.

Today's card was easy because the stamped parts were already colored and die cut.  I used WPlus9 Hello & Thanks and finished off the last of the images I colored while we were camping in July.  I have another card I'll share later, too.  Today it's very clean and simple with just a blush of blue on the card base and the die cut images arranged over that.


The blue ink on the card base is SU's Bashful Blue, applied with one of my Beauty Kate make up blending brushes.  The card base is Neenah 110 lb Classic Crest so it's very sturdy without layering.


Easy stamps to color and a card that went together very quickly.  I think I like that idea!  See you again soon!