Showing posts with label stamp room. Show all posts

Thursday, September 9, 2021

This and That Catch Up: Dogs, Garden, Stamp Room

Hi, everyone!  Some of you, my dear stamping friends, have been kindly asking about Wally and LuLu, and wondering how things have come together in my stamp room since all the home renovations, so I'm here today with a little catch up on that.

First, and most important in my heart is Wally and LuLu.  They're both as healthy and fit as you can imagine 10 and 12 year old dogs could be.  In the picture below they'd just returned from a neighborhood walk and are enjoying a little cool down on the lawn.


LuLu has had a remarkable recovery from her fibrocartilaginous embolism.  She has a slight limp and has to wear a bootie when walking on asphalt because she drags her foot a little bit when she's not thinking about it.  It takes some effort, so she tires more easily than in the past, but seems to be getting stronger every day.  On Labor Day we took the dogs for an off-leash walk on a woodland trail and they both ran like juveniles.  You'd never suspect a thing.  I could have cried with happiness.


With all the home renovations and then LuLu's embolism, the garden was neglected to a certain extent.  I watered and deadheaded, but not much else.  Our deck was torn out for the foundation work, so the flower pots were displaced and construction debris was everywhere.  It wasn't until late summer that we started working more earnestly outside.


There's my handsome Wally in the picture below.  He loves his blankie!


As for my stamp room, the only renovation in there was the flooring.  The whole house got new flooring, and what a huge deal it was to move out all the furniture!  My big desk (stamping command center) was broken in the process and there was no solution but to find a new desk.  We don't have a lot of resources in our town, so the new desk came from Wayfair.  I like it, but it's smaller with less surface area and storage than my other desk.


To make up for some of that lost space I added an additional piece on either end of it.  The white unit below is actually a kitchen cart from Wayfair.  I lost the drawer that I kept my large punches in, so I had to purge a few and hang the rest on a towel rack.  You can see "before" pictures here.  The rest of the room hasn't changed much except the floor.


I did a lot more purging and reorganizing, too much to mention.  I felt some despair at first, but it all worked out nicely.  In the end I have more room for stamps (my #1 passion), and I eliminated the overcrowding in my designer paper collection.

It would all be so much easier with built in wall to wall cabinetry and work surfaces, but this needs to stay a bedroom if we are ever to sell it as a 3 bedroom, 2 bath house.  Not planning on that, but you never know.

Back to stamping now.  I hope we can meet here again real soon!


Monday, February 3, 2020

Pretty Bird and Winter De-Clutter

Monday greetings, friends!  It's been a few days since I did any actual card crafting.  I've been on a wintertime stamp room de-clutter binge.  The last significant clean out was in 2017, so it was time.  OMGee, did I ever clear out a lot of ribbon!

There was a time I could hardly make a card without ribbon, and now I can hardly make a card with it!  So why was I keeping so much of it around?  Well, after I cleared out a shocking amount of it I tried to make a card with ribbon... then another... and another...  I just couldn't get happy.  Today's card is the best I could do and, honestly, after all that struggle I cleared out a whole lot more ribbon.


It's pretty enough, and the ink and ribbon are a nice match, but I'm never going to use enough ribbon to justify the space it was taking up.  Remember, I have a cupboard full of designer paper, too, and that would have been so much easier.

In the end, I cleared out 2 medium-size bags of ribbons and trims.


It gave me a lot more free space in my stamp room, including three additional drawers for stamps, which is really where my heart is.


I still have a lot of ribbon, but it's pared down to a single drawer now.


I also have a shoe box-size container of trims.  Seriously, how does it come to this degree of excess?  Most of this will go eventually, but it's all I could bear at this time.  More photos of my whole stamp room after the 2017 clean out can be seen here.  There was a lot more ribbon then.

About the card:

Penny Black Peaceful Time bird stamped in Distress Tea Dye ink and colored with Copics, then cut with coordinating die.  Background is Distress Oxide Peacock Feathers, Poppystamps Leafy Sprigs Border (2014), and Offray ribbon which is now in one of those bags to be given away (sob).


I hope to get back to stamping and coloring, but I also have a lot more de-cluttering to do.  Glad to have the ribbon chore behind me.  It really knocked the "mo" out of my "jo"!  Have a happy day!


Monday, June 4, 2018

Stamp Room and Blogger Issues

Welcome to Monday, friends!  I've done quite a bit of stamping since my last post, but none of it is included here today.  Instead, I have some just-for-fun-hanging-out-with-my friends (you) stamp room photos.  But first -- Blogger issues...


#1:  By now, most of you are aware of the Data Protection and Privacy Policy that is being talked about and added to blogs.  I wasn't sure if I needed it, but I added a page to include it.  See the tab above.  I copied and pasted the wording that has been made available, changing only the parts pertinent to my blog.

#2:  Email notification of blog comments.  As of this writing that handy feature has disappeared.  I hope it's temporary.  Since there may be a few bloggers who haven't heard of the fix yet, I wanted to pass along that tidbit.  In order to receive email notifications, comment on your own post and then be sure to click the box right below your name in the "choose an identity" section.  The box is labeled "follow-up comments will be sent to (your email address)".  I hope this helps those of you who were yet unaware of the fix.

Okay, moving along to the fun stuff...

Just a little something that kept me away from stamping for a little bit.  I've done another stamp purge and reorganization.  Tough choices were made, but living in the real world of a smallish stamp room with limited storage space, this is the way it must be.


I can't possibly use all the stamps I've collected.  The drawer pictured below holds 22 stamps, and I have 24 drawers like this stuffed full of stamps.  There are also several shelves of Stampin' Up, two baskets of Power Poppy, and four boxes of miscellaneous holiday stamps -- Valentines, St. Pat's, Easter, Halloween, Thanksgiving, Christmas.


Pictured below is my basket of not yet used stamps.  It's not bad, really.  Two are sentiments and two are sets I've used all but one stamp each.  Three sets are Christmas and will be used in due time.  I was making good progress.  Then along came the latest Power Poppy release.  Hey, it's their first since before Christmas and I do use my Power Poppy over and over again.  As if I was not going to get the new Power Poppy, sheesh!  Some I already have in digital.  Oh, yes... not pictured are the digital stamps I've not yet used.  Actually, their number has dwindled considerably.  Again... progress.  Relatively speaking.


But then there are the not yet used dies.  To be fair, some are seasonal, purchased on a super sale, and their season has not yet come.  Others I have specific plans for, but, honestly, with this many stamps and dies it takes a while to get around to everything.


So... now that I've bared all I'm hoping I'll produce so many cards you'll get tired of seeing them.  Every card I make finds a home.  Most are mailed by me.  Some are given to friends.  Occasionally I sell a batch.  I can never make enough to keep up with needs.

Just thought it would be fun to do this post.

So, what's your story?  Do you have a not yet used hoard or do you use it as soon as you get it?  Are you loving on the old stamps once in a while, too?  Do tell, please!  Back to stamping shortly.  I'm glad you could visit today and I'll see you again soon!


Saturday, July 8, 2017

Lots of Stamp Room Photos

Welcome to my humble and very clean and tidy stamp room.  Does it always look like this?   Ha!  In my dreams!  Note the Swiffer duster on the desk... oops.  Just a touch of realism.


Truthfully, ever since The Big Purge and The Redo I've kept the room very tidy.  When there's a work in progress it can get out of hand until I remind myself to pick up as I go along.  It's supposed to be a happy place, right?

So... I've been meaning to share photos of the new and improved room.  I love seeing other peoples' stamp rooms, so I hope you'll enjoy a visit.  It's nothing fancy, but it's home.  One of these days I'll put some blinds on the window, but for now I'm simply happy with the clean, well lit, openness of it.

In the first photo I'm standing in the doorway looking into the room.  It's approximately 12' x 12', so it can easily get crowded.  And it did get crowded before the redo.  I gave up a lot of stuff in order to be happy stamping in a small space.


The little white table under the window is where I do all my coloring.  It had to be petite enough for my small space.  Height, width, depth, knee space... I could not find a suitable table anywhere, so Rich made this one per my exact specifications.  And I love it.


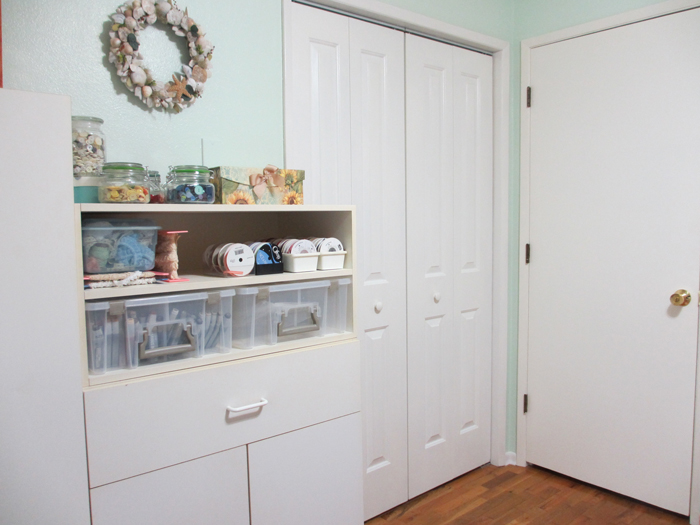
I guess we'll go clockwise around the room.  It's a short trip over to some storage cabinets.  The tall cabinet holds paper.  Nothing but paper.  There's a chest of doodads on top of the tall cabinet.  The  shorter cabinet holds mostly ribbon, with some cute and colorful button jars displayed on top.  See the plastic containers on the center shelf?  Those are for Copic various inks (refills).  Two containers give me room to grow.


Below you can see into the paper cabinet.  Tubs of 6x6 designer paper in quart storage bags (ziplock top cut off for easy access) with the scraps also in the bags.  There is some degree of organization -- pretty, cute, masculine, holidays.  Shelves of 12x12 Bazzill and Core'dinations card stock.  Whites in the drawers on the bottom shelf.


Drawers of ribbon in the other cabinet.  Bottom shelf for miscellany.


The top drawer of the cabinet is full of ribbon, too.  I hardly use it, gave away a ton of it, but still have lots.  All that purging didn't cut me short one bit.


Here we are at the next corner already.  I have to close the stamp room door to access the right half of the closet, but I don't mind.


Can't help myself... I love the buttons.  Purged bunches of them, but left these, sorted into color groups.  They double as stamp room decor.  Before the redo I didn't have room for decor.  All the wall space was used up with storage.


Inside the closet -- lots of stamps and organized storage.  Lazy Susans (turntables) on top make it easier to get at things.


Pictured below is the Stamping Command Center where card construction takes place.


More Stamping Command Center.  When I saw this big computer desk at Staples years ago I knew it was just what I needed.  Two of those baskets on top hold not yet used stamps, dies, and embossing folders.  I'm slowly whittling them down to size.


Some stacked storage inside the desk:


Moving around to Wall #4...  More of the Stamping Command Center, my sewing machine, die cutting center, and embossing stuff.  I was saving the Susan Wingert print for when the room was finished.  Cute, isn't it?  Embossing powders and Nuvo drops are kept in an old spice rack which I spray painted.  The two baskets hold my dies with room to spare.  I made envelopes and category dividers for all of them.  I also have a magnetic binder for my original die storage, but it wasn't long before I realized it was totally inadequate, seeing as how I became so enamored of dies.


The bottom drawer of the desk and the whole file cabinet are full of 8 1/2 x 11 card stock and whatever specialty papers.  A ridiculous lot of it.  You can see my Copic carrying case tucked down there beside the black file cabinet.  I keep all my Copics in the case and just slide it over to me when I color.  There's a color chart in there, too.


And now we're back here again.  It's a small room with a whole lot of fun packed into it.  Everything in its place and plenty of open floor space.  On the corner shelf unit are stamps and a basket of embossing folders.  The photo storage boxes hold miscellaneous stamps, loosely categorized and room to spare.  The drawer cart by my coloring table holds a variety of coloring mediums, and gives me extra surface to set something if necessary.


All the lamps are Ott lights and there are three daylight bulbs in the overhead fixture so it's like sunshine in there day or night.  I like a lot of light when I'm "working".

My goal is to never ever let my room get over crowded again.  Everything must fit into the available storage and if it doesn't fit, something has to go.  I've quit buying colored card stock and designer paper for obvious reasons.  I'm trying to use all the not yet used stamps and dies before I buy more.  That's NOT easy, friends!

My stamp room, small and unremarkable though it may be, is a magical place for me.  You know what I'm talking about, don't you?  Hmm... maybe I'll head in there now and see what I can color up.

Thanks for visiting!  I hope you had a good trip!


Sunday, March 5, 2017

Painting the Stamp Room

Hi, friends!  Since there's not much in the way of stamping going on here I thought I'd share a little peek at what's been keeping me busy.  I was in an energy lull after Christmas, which went on far too long, so I thought it was time to start painting my stamp room.  Seems like it's taking forever, but considering we only work on it a couple hours a day, what can I expect?  There are a lot of other things that need doing, as well.

Two walls and the ceiling are done, so I put half the room back together.  Check out the color.  I thought I had selected a pale aqua, but it appears more mint green to me.  Minty fresh.  I like it more all the time, but I still keep trying to see aqua in it.  The mint green is rather retro looking, but when you get down to it, aqua is a rather retro color, too.  Think old cars and every kitchen my mom ever had when I was growing up.  Okay, you wouldn't know about the kitchens, but trust me...  Mom said it was a cool color and she needed that in the kitchen.


The other half of the room still looks like this (below).  You can see the old color.  Hey, it looked good at one time.


Meanwhile, this is going on across the hall where LuLu has laid claim to a pile of warm laundry.  I know... dog hair, sheesh!  Just give it a good shake.  Love me, love my dog hair.


I finally hung up the seashell wreath I bought last summer.  It has nothing to do with stamping, but I like it and it looks good with the color.  Crafted by a local artist from local beach findings.  I have another one in my blue bathroom.


Mint green... or aqua...?  I'm so confused!  There is a fine line between the two colors.

Two walls to go and some finishing touches, but it already looks so much more bright and cheery.  I'm heading off to paint, now.  See you soon, I hope!  Have a good day!


Friday, November 4, 2016

Autumn Critters and Autumn Window

Might as well finish up the week with one more card and make it something on the lighter side.  These critters tickle my funny bone and, hey, I've seen them all outside my window.  That's probably a moose, though, isn't it?  I do not see moose outside my window, but plenty of deer.  This is Bugaboo's Autumn Critter Stack 02.


They're colored with Copics on X-Press It Blending Card.  I covered the card base with some old BasicGrey Origins papers and added leaf accents and a candy dot.
 
Speaking of "outside my window"... 
 
 
That's one angle of the view from my new stamp room window.  I'm blissfully happy to have this in front of me when I sit and color, rather than a blank wall.  See any of those critters out there?   Hmmm... not today, but it does look rather autumn-ish, doesn't it?
 
And, speaking of critters...
 
 
Here's my Dooby Doo (LuLu) with two toys and a piggy.  Just thought I'd throw that in 'cuz she's so cute.
 
Back to the card...
 
 
Now that I have the window, my (ahem) ultra-sophisticated photography set up involves setting a card on top of one of my stamp-containing photo boxes and snapping a quick pic.  The work space is lit with two Ott lamps, so that balances out the light.  It may not be magazine quality, but it's easy and natural and I can't help but love the dappled green in the background.
 
I'll leave you now with a list of card ingredients and a wish for a happy weekend.  Take care!
 
Stamps:  Bugaboo Autumn Critter Stack 02, Stampin' Up! All Year Cheer 1 (sentiment)  Paper:  X-Press It Blending Card, white card base, YoYo Yellow, BasicGrey Origins designer paper  Ink:  Printer, Memento Tuxedo Black, Copics for coloring  Accessories:  Stickles Stardust glitter glue, candy dot, Taylored Expressions Stitched Rectangle Stacklets, Memory Box Stitched Circle Layers, Impression Obsession Small Leaf Set

Monday, October 3, 2016

Retro Butterfly

Did you stamp Saturday for World Cardmaking Day?  I sure did!  Spent most of the day in my newly revamped stamp room and, gosh, was it ever nice.  Everything so tidy and organized and uncluttered.  All that space to move around in.  After the new window is installed and painting done I'll have a hard time ever leaving it.
 
I'd like to use my "retro" stamps more.  I got reacquainted with them when I was purging and making tough decisions and, honestly, many of them do seem brand new to me after lying dormant for so long.  Years ago I did a brief stint on Rubbernecker's design team, during which time I received a bag full of loose, cling mount stamps.  I've kept most of them, and Saturday I decided to use one for old time's sake.  I don't remember the name of the stamp as it was not packaged when I received it.  I thought the butterfly (Rubbernecker) and the sentiment (Fiskars, also several years old) made a nice combination.  This is a birthday card, by the way.
 
 
I stamped in Versamark, embossed in gold, and watercolored with my Gansai Tambi paints.  Made the background wash first, then painted the butterfly image, touched up the background a little more, and finished with a few splatters.  The photo washed out the gold a little, but it looks very gold in real life. 
 
A vanilla card base is covered with older 7 Gypsies designer paper.  I wasn't going to add the string (more of my Fun Fibers) but I saw the current Retro Rubber Tie Me Up Challenge and decided to go for it.
 
 
All those Rubbernecker stamps that weren't being used because they were jumbled together in a bag and I couldn't actually see what they were...  I grouped them into mini-sets, stamped an index sheet for each and placed them in these clear boxes I've had for years.
 
 
I tell you, I'm an organizing fool lately!  Have a good day!
 
 
Stamps:  Rubbernecker butterfly (name unknown), Fiskars Make a Wish Quotes  Paper:  140 lb hot pressed watercolor, vanilla card base, 7 Gypsies Gypsy market designer paper  Ink:  Versamark  Coloring:  Gansai Tambi watercolor paints  Accessories:  Ranger Queen's Gold embossing powder, Fun Fiber, Scotch brand foam mounting tape