Showing posts with label botanical. Show all posts

Friday, September 12, 2025

The Flower Challenge Sketch

Hello friends!  How about some spring flowers in fall?  The Flower Challenge is a welcoming place for flowers year 'round, and this month they've given us a sketch for starters.  I'd set aside Penny Black's Good Wish Bouquet for NBUS coloring and I figured I could make it work with the sketch.


Here's the basic idea:


I added the band on the left to cover an unstamped edge.  The background is Hero Arts Leafy Vines.  I used blending brushes to apply inks to the stamp in my MISTI, and was pleasantly surprised at what a nice job it did.  Colors are listed in the recipe.

The flower stamp and butterflies are watercolored with Twinkling H2Os on 140 lb hot pressed WC paper.  I hand cut the flower and vase.  This set is part of a group I've stamped with intentions of coloring, cutting out, and setting aside to be made into cards as time allows.  I need this outlet, and it's nice to have something creative/crafty in the works for whenever I have a few or a lot of minutes.


I've also simplified the photo process -- same set up every time, no props.  I'm feeling optimistic as opposed to overwhelmed.

I'm sending my card and a big thanks to the following challenges.  The administrators and DTs put a lot of work into these challenges and I do appreciate it.


And one more per Lisa's friendly reminder:

Just Us Girls #792 -- Word Week -- Container


A big thanks to all of you, too, for stopping by.  What would I do without my crafty friends?  Group hug!


Stamps:  Penny Black Good Wish Bouquet, Hero Arts Leafy Vines  Paper:  Fabriano Artistico Extra White 140 lb hot pressed watercolor, Neenah Classic Crest Super Smooth Solar White 80 & 110 lb, SU Old Olive  Ink:  Ranger Archival Watering Can for flowers, Memento Tuxedo Black for sentiment, SU Old Olive, Pumpkin Pie, Summer Sun for background  Coloring:  Watercolor with Twinkling H2Os  Other:  Memory Box Stitched Circle Layers, Impression Obsession Butterfly Set, SU Subtle 3D embossing folder, Honey Bee gems

Friday, September 5, 2025

Mushrooms for Autumn

Hello everyone!  I'm happy to share my first fall card of the (almost) season.  We still have a few days of summer left so I'm not letting it go yet, but I do love fall cards.

I've had this Spellbinders Mushrooms From Me To You 3D emboss & cut folder for approximately a year.  I bought the Scallop Labels and Tag dies at the same time and have used them quite a lot, but this is the first time for the mushrooms.  I don't have a good excuse for why I waited so long.  It's so cool how it works!  The dies go right into the folder with the paper so it literally cuts and embosses at the same time.  I guess I was under a rock again because I did not expect that.


So this is my result after simultaneously cutting and embossing, then "painting" with Tombow markers and blender, and embossing again just for good measure.  After all that I decided to smoosh it all over with Versamark ink and emboss with ultra-thick embossing enamel.  Loved it.  Slipped it into the folder and embossed again.


I embossed the entire folded grocer's kraft card base with my Tim Holtz Lumber 3D embossing folder.  Lined the inside with vanilla cardstock and will save the sentiment for later.

With all this embossing going on I naturally want to share in the Can You Handle the Pressure Challenge.  It's plain to see I did not go with the optional "Balloons" twist.

I'm also sharing in the following challenges:


Thanks so much for visiting.  It's been busy as ever here, especially now that Ridley has joined the family.  Two Golden Retrievers are definitely better than one!  Have a happy day!


Stamps:  None  Paper:  Fabriano Artistico Extra White 140 lb hot press watercolor, Stampin' Up Old Olive, grocers kraft, Cougar Vanilla  Ink:  Versamark for wet embossing  Coloring:  Tombow markers and blender  Other:  Spellbinders Mushrooms From Me To You 3D emboss and cut folder, Tim Holtz Sizzix Lumber 3D embossing folder, Spellbinders Scallop Labels and Tag dies, Ranger Ultra-Thick Embossing Enamel

Thursday, August 28, 2025

Sweet Thoughts

Hello!  I made a card just because I had an urge to color something and I have a few not-yet-used Pinkfresh stamps that need attention.  I was able to finish this in a mere week.  I know!  It's been crazy busy here lately.


One stamp and one die does the whole works at once.   This is just part of it.  I colored with Copics and added Diamond Stickles to the flower centers.  Some of the flower parts are popped up, some glued flat.  The heart was punched from gingham cardstock and coated with JudiKins Diamond Glaze.

If I'm slow to visit your blog, please bear with me.  Maybe I'll have a chance to visit and share again soon.  There are reasons, and some of them are good.

  💗

Today I'm sending my card along to Darnell's NBUS Challenge -- My never before used schtuff is the Pinkfresh Berries and Blossoms stamp and die. 

Thanks so much for stopping by!


Stamps:  Pinkfresh Berries & Blossoms, Power Poppy sentiment (retired)  Paper:  Neenah Classic Crest Super Smooth Solar White 80 & 110 lb, PTI Aqua Mist, Echo Park Agenda designer paper (older)  Ink:  Memento Tuxedo Black  Coloring:  Copics  Dies:  Spellbinders Essential Arches, Scored and Pierced Rectangles  Other:  Heart punch, JudiKins Diamond Glaze. Stickles Diamond glitter glue, Memory Box Fairy Jewels, Scotch brand foam mounting tape


Tuesday, August 19, 2025

Double D Challenge: Butterflies


Is there a soul among us who doesn't love the sight of a beautiful butterfly?  That's our challenge at Double D this time around.  Have a look at our gorgeous inspiration board:


So many colors to delight the eye!

The DDs offer a prize for a random winner, and the team votes on creative favorites.


I played off the blue and pink in the upper left corner of the board.  My butterfly is an oldie by Impression Obsession.  The die cuts the open scroll, but I managed to keep the inner parts together long enough to secure a solid background.  It's cut from shimmery paper and brushed with inks.


What better place to alight than a rose garden?  It's Tim Holtz Sizzix Roses 3D embossing folder, a gift from a dear local friend who knew I would love it.  I'm using it for the first time here, brushed with inks and a butterfly-appropriate sentiment stamped in the corner.


Do stop by the Double D blog to enjoy all the team's butterflies, and then show us yours!

Take care, and have a wonderful day!


Stamps:  Power Poppy Lilac Time sentiment  Paper:  White shimmer CS for butterfly, Neenah 110 lb white for embossed panel and card base  Ink:  Stampin' Up Brilliant Blue, Bashful Blue, Old Olive, Certainly Celery, Mauve Mist, Memento Tuxedo Black  Other:  Impression Obsession Open Scroll Butterfly, Tim Holtz Sizzix Roses embossing folder, black gem

Tuesday, August 5, 2025

Double D Challenge: Bee Happy


Hello and welcome to another Double D Challenge!  This one is all about the bees and bee-ing happy.  Have a look at our inspiration board:


And a prize for a random winner.  So cute!  Creative favorites are by team vote.


The idea is to use bees and/or the word "happy" on your card or project.  The concept automatically evokes happy thoughts of summertime, flowers, honey, warm colors -- so today I'm celebrating all of it with my card.


It's another opportunity to sit back and let the designer paper do most of the work.  Kinda sorta.  I started with a background of beautiful paper, added a decorative panel, and cut a trio of pieces from another page to place across the front.  It's a formula that always works and I could make a bunch and love them all.  Hmmm... maybe I will.  Heaven knows I've got plenty of designer paper!

Aren't those little die cut bees cute?  They're Memory Box Buzzing Bumblebees.  I was certain they'd be great for flower cards so I added them to my collection last summer and it only took me a year to get around to actually using them, sheesh.  Now I love them!  I made up a double batch so I'd be sure to use them again soonish.


The Double D team has all kinds of inspiration for you and I hope you'll play along.  I would love a gallery full of bee and/or happy cards!

Have a super day!


Stamps:  None except inside sentiment  Paper:  Cougar Natural for card base and bees, Memory Box Parsley, Paper Rose Bees & Butterflies designer paper  Coloring:  Copics for die cut bees  Other:  Impression Obsession Fancy Cut Out Border, Memory Box Buzzing Bumblebees, 49 and Market epoxy heart

Friday, August 1, 2025

Bird with Pansies

Hi, and welcome to a new month!  One more card for this week.  This is the Penny Black Perch set again and definitely the stamp that sold me the set.  I just love the sweet bird.  It looks like it's smiling.


It's colored with Tombow markers and blender on hot press watercolor paper.  Sometimes I just stamp a set's images, then color and cut out and think about the cards later.  That's the case here.  It seems there are more options (and more fun) with the card design when I'm working with a collection of homemade ephemera.  The same goes for dies.  Gee, I think I'll get started on a bagful today!


I used some of that JarThenaAMCS paper again, an Amazon find.  I especially love this piece.  You'd think they could make the name more appealing.  It's actually quite nice paper.

I'm moving over to the other side of the room now, where I have a few things on my table waiting for playtime.  I hope we can visit again real soon!


Stamps:  Penny Black Perch and Enchantingly (sentiment)  Paper:  Fabriano Artistico Extra White 140 lb hot press watercolor, Neenah Classic Crest Super Smooth Solar White 80 lb, designer paper from Amazon  Ink:  Ranger Archival Shadow Grey, Stampin' Up Mellow Moss  Coloring:  Tombow markers and homemade blender  Other:  Spellbinders Scallop Labels and Tag, Memory Box Fairy Jewels

Wednesday, July 30, 2025

Spring Flowers in July (almost August!)

Hi friends!  I thought I'd do some stamping and coloring this week.  I haven't had so much crafty time , but I can generally find a few minutes to color a flower or two.  With that in mind I stamped some Penny Black and got to work.

This stamp is from the Perch set, which I think was released this year.  I'm so far behind in my not-yet-used goodies that I lose track of time.  The sentiment is also Penny Black, very old (2011) and I still use it lots.


Coloring was done on hot press watercolor paper with Tombow markers and homemade blender solution (recipe found online).  Fill a blank Copic marker and use it very much like a watercolor brush.  It sure seemed like the green was a better match with the paper, but the camera will do what it wants.  You know how that goes.  I hand cut the image and sentiment, tucked the flowers into a wonky-curved pocket made with oval dies, then stuck all that onto a background embossed with a favorite old Cuttlebug folder.  Only the sentiment is popped up.


About that leafy paper... I found it through an Amazon ad on Pinterest and the only name on it is JarThenaAMCS.  Apparently it's a whole store.  You just never know what you're going to come across next.

No challenges today.  Just me having a play with my toys.

Wishing you a lovely day!


Stamps:  Penny Black Perch, Penny Black To You  Paper:  Fabriano Artistico Extra White 140 lb hot press watercolor, Neenah Classic Crest Super Smooth Solar White 80 lb for background, 110 lb for sentiment, Prism Dark Herbal Garden (old), JarThenaAMCS designer paper (from Amazon)  Ink:  Ranger Archival Shadow Grey, Memento Tuxedo Black  Coloring:  Tombows and blender  Other:  Spellbinders Classic Ovals, Cuttlebug Birds and Swirls embossing folder, Memory Box Fairy Jewels gems, Scotch brand foam mounting tape

Friday, July 25, 2025

Winged Creatures and Gorgeous Paper

Hello and happy Friday!  Yesterday I said I would have one more card today.  As it turns out, I have two.  It's all about the designer paper today, specifically Ciao Bella Sicilia, chosen for these cards because it prominently features lemons and all that beautiful yellow.  You know I love yellow!

Do you see the lemon slices around the edges?  I cut this 6x6 piece down to 5 1/4" square to cover the card, then simply added the die cuts -- Memory Box Serene Bird and Branch, and Sue Wilson Creative Expressions Just a Note.


The second card is another piece that did most of the work, but I did add a border for contrast, and a pretty dragonfly and sentiment -- Memory Box Azure Dragonflies, and Sue Wilson Creative Expressions Stacked Thinking of You.


This wraps up a week of citrus and Christmas.  It's a lot more crafting than I normally accomplish in a week, but I had some extra down time due to back and foot pain.  I'm fine, just had to limit certain activities, and am now feeling quite a bit better.

I'm happy to be playing along in the following inspiring challenge today:

Love Those Pretty Papers -- Anything goes with designer papers, or optional 'birthday'.


I keep saying I'm going to make a point of playing with my paper more often.  The Vast Hoard is overflowing with gorgeousness!

I plan to be back tomorrow with some pics of Sophie and the critters that visit our home on the edge of the woods.  Maybe I'll see you then.  Take care, and have a great weekend!


Wednesday, July 23, 2025

Lemon Branch

Hi there!  Yes, I am back so soon with another citrus card.  This one was inspired by the Color Hues Challenge where Bonnie is asking for yellow and green.  Not only do I love the color combo, but you know I have this new citrus set...


We have lemons today with a combo of sentiments from my stash and the Spellbinders Splish Splash embossing folder.  It's not even real apparent that the embossing is water splashes, and that's what I love about the folder now that I've finally used it for the first time after waiting far too long, sheesh.  I actually wanted it to look more like juicy lemon drops this time, but there's too much yellow and I didn't want to start over.  The thing is, I love how pretty and fun and versatile the folder is and I'll make a point of using it more often in the future.

Pictured below you can see glitter on the flower centers and glossy dots for accent.  The dots are 1/4" and 1/8" punched cardstock coated with Diamond Glaze.


I'll list supplies further down, but first to recap the aforementioned challenge and add one more:

Color Hues Challenge #114 -- Yellow and green.
NBUS Challenge #76 -- My never before used schtuff is the Splish Splash embossing folder.


Well, that was fun!  There's another citrus card still to come, but I'll save that for another week.  See you again soon!


Stamps:  Pinkfresh Lemons and Blueberries sentiment  Paper:  Neenah Classic Crest Super Smooth Solar White 80 & 110 lb, scraps yellow, white, black cardstock  Ink:  SU yellows and greens, Memento Tuxedo Black for sentiment  Coloring:  Ink blending with brushes  Dies:  Elizabeth Craft Fresh Fruit, Sue Wilson Creative Expressions Stacked Happy Birthday, Spellbinders Scallop Labels and Tag, small rectangle from stash  Other:  Spellbinders Splish Splash embossing folder, Diamond Stickles, 1/8" and 1/4" hole punches, JudiKins Diamond Glaze

Monday, July 21, 2025

Orange Slices

Hello and happy day to you!  I've had a few busy mornings in my craft room and today I thought I'd share some of the fruits of my labor before the day grabs hold of me.  A few challenges prompted me to sit down with one of my newest purchases -- Elizabeth Craft Fresh Fruit die set.   One day I said "I need a citrus set", and so here we are.

I took creative liberties with the colors, using some ancient greens that don't come off the shelf very often -- mostly Stampin' Up Green Galore, with a little Glorious Green ink for shading.  Anyone remember those?  I even colored the flower centers green just because I could.


There are lots of choices with this die set from lemons to oranges to grapefruit.  Even a strawberry.  Not selling, just saying.  I'm imagining today's card with a standard orange slice and a little Clementine.

Covering the card base is Tiny Mosaic, an old Cuttlebug embossing folder from my stash.  It looks rather kitchen-y don't you think?  

In the next photo I hope you can see the Diamond Stickles glitter in the flower centers, and the gloss on the orange slices.  The gloss is packing tape -- brush cardstock with ink, then cover with clear packing tape and cut with the inner die that creates the little sections.  Cut again from non-glossy cardstock to create the lighter colored "frame" for the sections.  Maybe that makes sense???

For embellishment I punched 1/8" circles from the glossy orange cardstock.  The three-layer sentiment is from a not-used-until-now Cottage Cutz set.


One last thing -- the card measures 4 1/4" x 5".  It's what's left over after cutting a mini-slimline; a cute little size, fun to work with, and it fits in a standard envelope for no-extra-postage mailing.

Sometimes it feels like it takes a lot of words to explain a card, but it's all about the sharing and taking the time to visit with you.

This particular card was totally inspired by the following challenges:

Tic Tac Toe Challenge #275 -- I chose the top row:  Nature, Circles, Foliage
NBUS Challenge #76 -- My never before used schtuff is the Fresh Fruit die set and the sentiment from a Cottage Cutz set.


I'm so glad you could stop by.  We'll do this again real soon, okay?  Take care!


Stamps:  None except inside sentiment not shown  Paper:  Neenah Classic Crest Super Smooth Solar White 110 lb, Stampin' Up Green Galore  Ink:  SU Tangerine Tango, Apricot Appeal, Green Galore, Glorious Green  Coloring:  Ink blending with brushes  Dies:  Creative Expressions Fresh Fruit, Cottage Cutz Hello Sunshine, Memory Box Stitched Circle Layers and Stitched Scalloped Circles  Other:  Cuttlebug Tiny Mosaic embossing folder, Diamond Stickles, clear packing tape, 1/8" holed punch, Scotch brand foam mounting tape

Tuesday, July 15, 2025

Double D Challenge: For the Kiddos


Hello there!  The Double D challenge is all about the kids today.  We have a fun board for inspiration...


... and a cute stencil prize for a random winner.  As always, creative winners are by team vote.


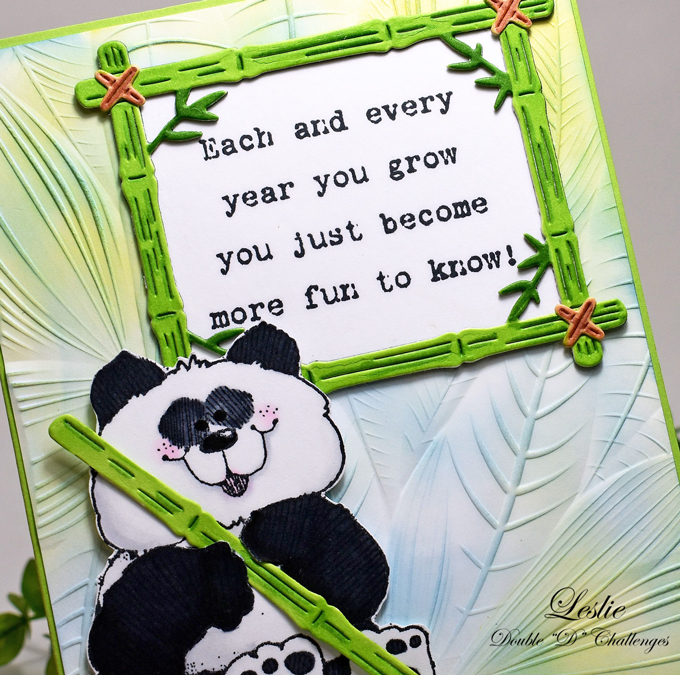
The board is full of Disney characters, which I don't have in my collection, but I was inspired by Pooh Bear to pull out one of my oldest stamps by DJ Inkers (or Hooks, Lines, and Inkers -- 1993).  I've used this guy many times in the past, but it's been more than a minute since he last saw ink.  He's just so easy and fun and cute, and he goes perfectly with my Cottage Cutz bamboo frame.


The sentiment is an oldie from Stampin' Up.  The background is a Sizzix 3D folder called Fallen Leaves -- another oldie and one of my most gorgeous favorites that WOWs me every time.  I brushed on yellow and blue inks for a soft suggestion of a bamboo forest.

Just for fun I cut an extra frame and trimmed off a piece for the panda to play with.


The team has some cute cards to share with you on the Double D blog!  If you need a card for one of the kids in your life perhaps you'd like to play along.  We'd love to see you there!

Have a wonderful summer day!